By: Vortex Since: Sep 2019 Licence: MIT
- 1. Introduction
- 2. Getting Started
- 3. Features
- 4. Limitations
- 5. Commands
- 5.1. Viewing help :
help - 5.2. List all contacts or activities :
list - 5.3. View a contact or activity :
view - 5.4. Create new contact:
contact - 5.5. Create new activity:
activity - 5.6. Inviting contacts to an activity:
invite - 5.7. Disinviting contacts from an activity:
disinvite - 5.8. Add expenses to an activity :
expense - 5.9. Settle debts in an activity :
settle - 5.10. Edit an existing contact or activity :
edit - 5.11. Finding contacts or activities:
find - 5.12. Deleting a contact, activity or expense:
delete - 5.13. Add variable split expenses to an activity:
varexpense(v2.0 only) - 5.14. Assign an activity as a sub-activity:
assign(v2.0 only) - 5.15. Exiting the program :
exit
- 5.1. Viewing help :
- 6. FAQ
- 7. Powerusers
1. Introduction
Ever did group activities where everyone paid different amounts, and it became so troublesome and confusing to figure out how to redistribute costs evenly? Fret no more because with SplitWiser is here! SplitWiser is a free tool for friends and roommates to track bills and other shared expenses, so that everyone gets paid back, and everyone is happy.
As part of the v2.0 release, SplitWiser will also launch with a mobile version for Android and iOS devices, allowing seamless integration across all your computing devices.
2. Getting Started
-
Ensure you have Java 11 or above installed in your Computer.
-
Download the latest
SplitWiser.jarhere. -
Copy the file to the folder you want to use as the home folder for SplitWiser.
-
Double-click the file to start the app. The GUI should appear in a few seconds.
-
Type the command in the command box and press Enter to execute it.
e.g. typinghelpand pressing Enter will open the help window. -
Some example commands you can try:
-
list c/: displays a list of all your contacts -
contactn/John Doe p/98765432: adds a new contact namedJohn Doewith mobile number98765432to SplitWiser. -
list a/: displays a list of all tracked activities -
view a/1: view details of the 1st activity shown in the list of activities -
exit: exits and closes the app
-
-
Refer to Section 5, “Commands” for details of each command.
3. Features
3.1. Auto-saved data
SplitWiser data is saved in the hard disk automatically after any command that changes the data.
There is no need to save manually - you don’t have to worry about forgetting to save!
3.2. Simplify debts automatically
SplitWiser has a fast and effective algorithm to simplify all debts that you add. It handles huge groups (hundreds!) and all their expenses with ease! No need receipt-collecting and number-crunching anymore — SplitWiser does it all, and more!
3.3. Persistent app state (v2.0 only)
SplitWiser also saves its application state with your data - meaning you can re-launch the app and continue where you left off!
4. Limitations
4.1. Application window size
For improved compatibility across different operating systems, the application window size is locked and not resizable by the user.
4.2. Floating-point rounding
Amounts smaller than $0.01 are not displayed to full precision. Instead, SplitWiser indicates that the amount is <$0.01.
5. Commands
Command Format
-
Words in
UPPER_CASEare the parameters to be supplied by the user e.g. incontact n/CONTACT_NAME,CONTACT_NAMEis a parameter which can be used ascontact n/John Doe. -
Successive parameters are separated by one or more spaces.
-
Parameters in square brackets are optional, e.g
n/ACTIVITY_NAME [p/PERSON_1]can be used asn/Drinks p/John Doeor asn/Drinks. -
Parameters with
… may be supplied multiple times, including 0 times for optional parameters, e.g.[tag/TAG]…can be used astag/friend,tag/friend tag/familyetc. -
Parameters may be supplied in any order unless specified otherwise, e.g. if the command specifies
n/NAME p/PHONE_NUMBER,p/PHONE_NUMBER n/NAMEis also acceptable.
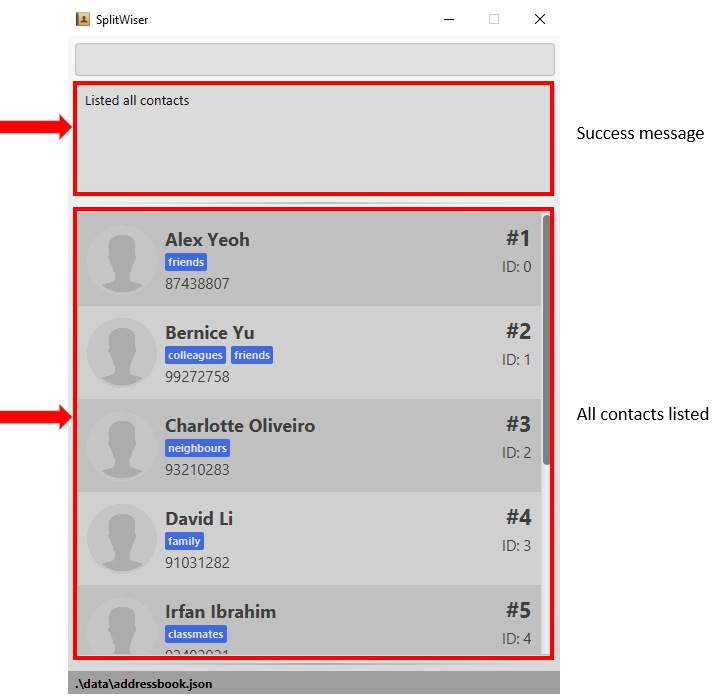
5.2. List all contacts or activities : list
Switches the current view to list either all contacts or activities.
The following screenshot displays the appearance of the list of contacts and activities respectively.
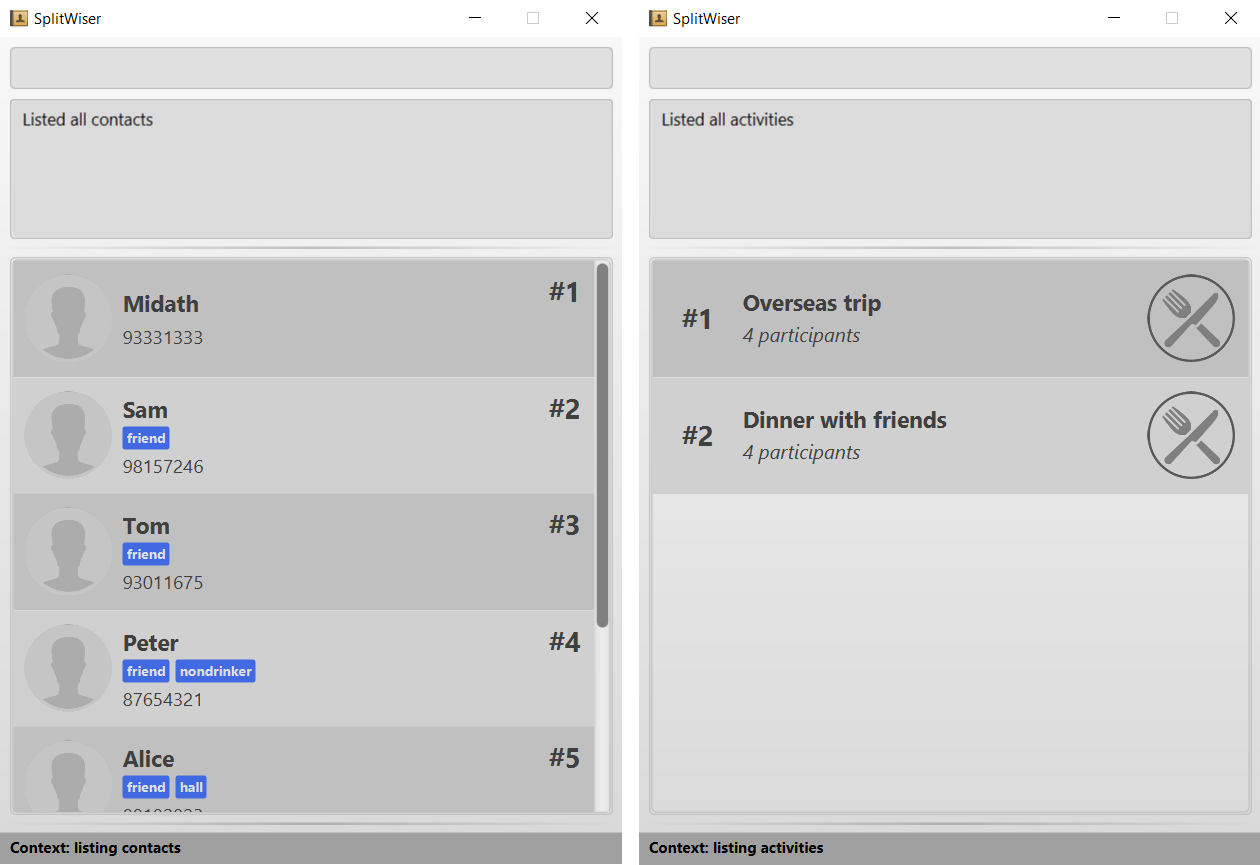
Format: list c/ for contacts OR list a/ for activities
5.3. View a contact or activity : view
Switches the current view to show details of a contact or activity based on their display index in the current/last viewed list.
The following screenshot displays the details panel for a contact and activity respectively.
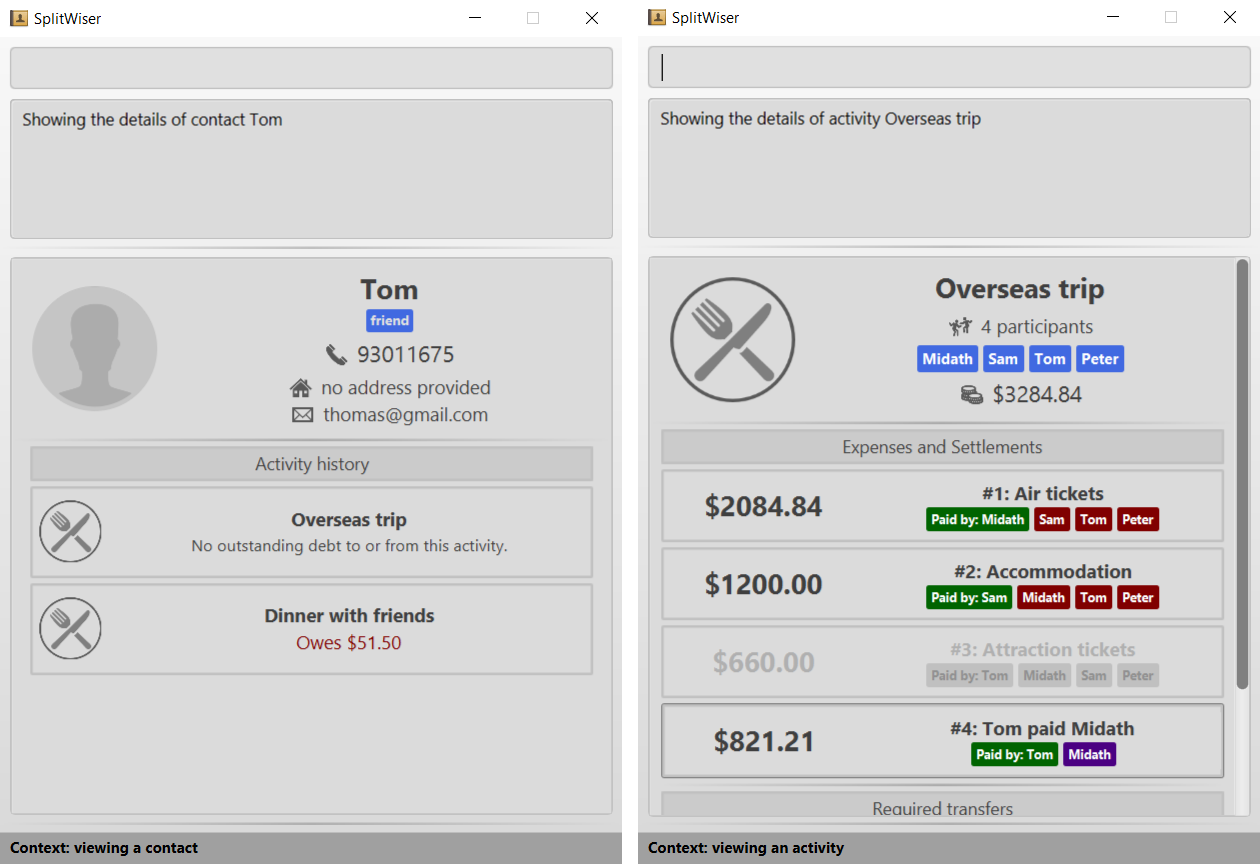
Format: view a/ACTIVITY_ID OR view c/CONTACT_ID
Examples:
-
view a/1
Views the details of the first activity, if the activity list was last displaying one or more activities -
view c/2
Views the details of the second contact, if the contact list was last displaying at least two contacts
5.4. Create new contact: contact
Creates a new contact with a name and phone number. Each contact will be assigned a contact ID automatically. Optionally, an email, home address and tag(s) can also be specified.
Format: contact n/CONTACT_NAME p/PHONE_NUMBER [e/EMAIL] [tag/TAG] [a/ADDRESS]
Examples:
-
contact n/John Doe p/98765432
Creates a new contact with name John Doe and mobile number 98765432.
5.5. Create new activity: activity
This command creates a new activity with a title, contacts (optional) and no expenses.
Format: activity t/ACTIVITY_TITLE [p/PERSON …]
Example:
Suppose that you went for a breakfast with David and Alexa, and want to create an activity for it.
Step 1: Type in the following command into the command box, and press Enter to execute it.
activity t/Breakfast p/David p/Alexa

Step 2: Observe the output to check if it was successful, and if there are any warnings. Check the bottom display window for details of the newly created activity. In this case, because there is no contact called "Alexa", it is not added to the activity and a warning message is shown.
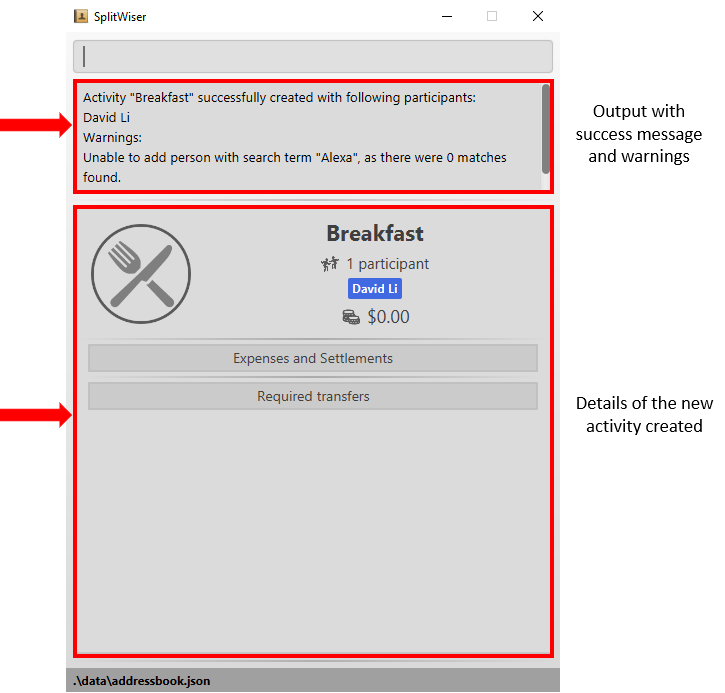
|
If none of the search terms are valid, an activity will still be created, without any participants. |
5.6. Inviting contacts to an activity: invite
This command invites the contacts specified to the current viewed activity.
Format: invite p/PERSON …
Example:
Suppose you have already created an activity with Alice, Bob and Carl in it.
activity t/Holiday Trip p/Alice p/Bob p/Carl
And you have friends that want to join an activity midway.
To invite:
Step 1: Type invite into the command box and specify the contacts you want to invite from the contact list with the p/ prefix e.g. invite p/Mary p/John p/Carl and press Enter to execute it.

Step 2: Observe the output in result box and the activity details box.

The invite command only invites to current viewed activity.if there is no current viewed activity, there will be an error. The invite command only invites contact that exists in the contact list.If the specified contact does not exist in the contact list, then the contact cannot be added and a warning message will be shown. Multiple contacts can be invited at once. Contact that already exists in activity cannot be invited again. |
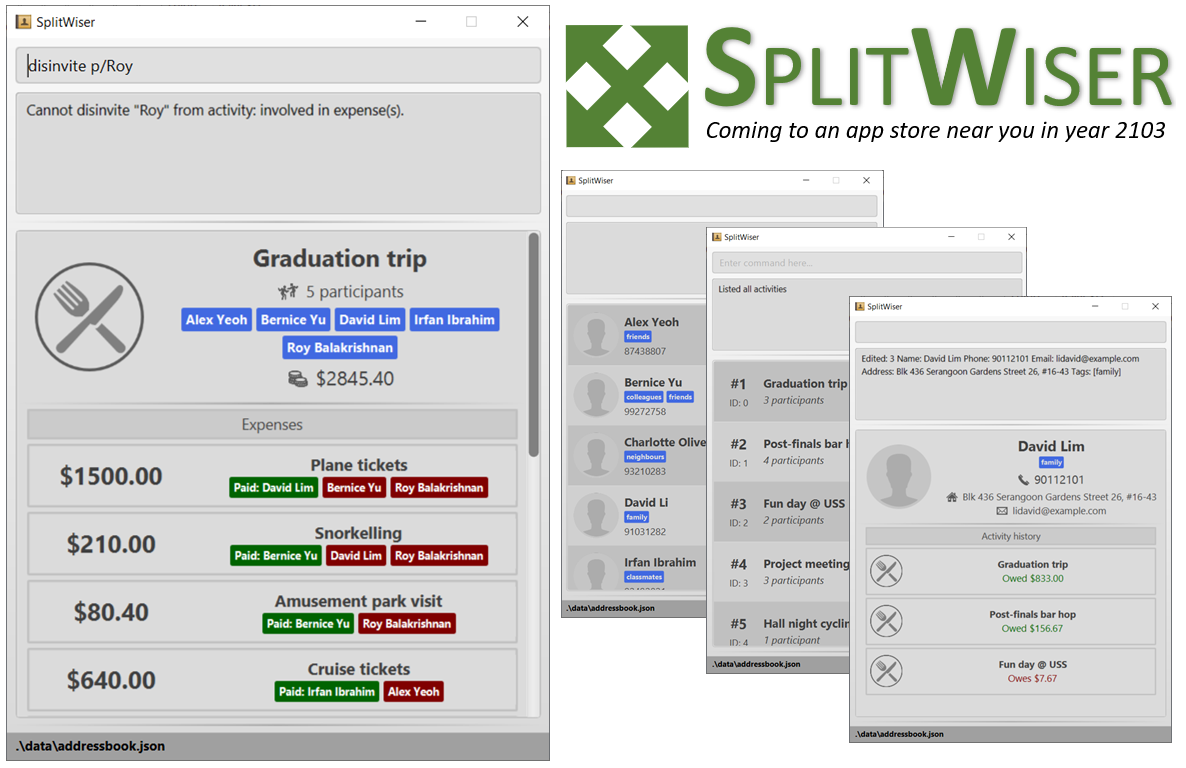
5.7. Disinviting contacts from an activity: disinvite
This command disinvites the contacts specified from the current viewed activity.
Format: disinvite p/PERSON …
Example:
Suppose you have an activity with the same participants but with an expense shared by Alice, Bob and Carl

And you feel that the activity has too many participants that do not participate in any event, thus having no shared expense and you decided to remove them.
To disinvite:
Step 1: Type disinvite into the command box and specify the contacts you want to disinvite from the activity with the p/ prefix e.g. disinvite p/Mary p/John p/Carl and press Enter to execute it.

Step 2: Observe the output in result box and the activity details box.
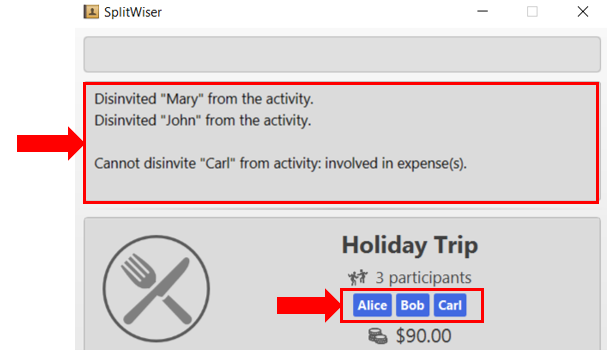
The disinvite command only disinvites from current viewed activity.if there is no current viewed activity, there will be an error. The disinvite command only disinvites contact that exists in the activity.If the specified contact does not exist in the activity, then a warning message will be shown. Multiple contacts can be disinvited at once. Contact that involves in any expense cannot be disinvited. If a contact is involved in any expense, he cannot be disinvited. |
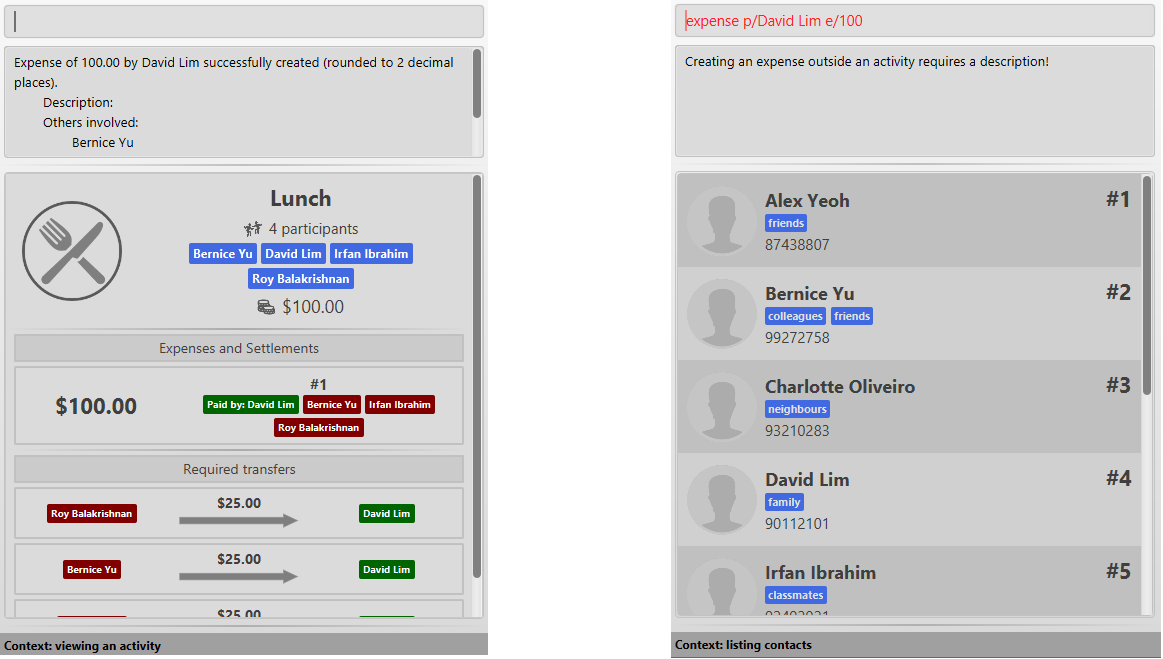
5.8. Add expenses to an activity : expense
This command creates a new expense with a list of contacts, an amount and an optional description, and adds it to the currently viewed activity. The first contact in the list is taken to be the person who paid for the expense, and the remaining people will be counted as owing the first person money. Any duplicated person will be ignored.
If only one contact is specified in the list, then SplitWiser will assume that all current participants in the activity are involved in this expense and thus owe this person money.
If no activity is being viewed, the description is compulsory - a new activity will instead be created with the same title as the description (as if activity t/ACTIVITY_NAME was called). The expense and contact(s) will then be added to the activity. You may wish to change the title of this new activity using the edit command thereafter (refer to Section 5.10, “Edit an existing contact or activity : edit”).
Format: expense p/PERSON e/AMOUNT_PAID [p/PERSON …] [d/DESCRIPTION]
Examples:
-
expense p/David Lim e/100
Adds a single expense of $100 by David Lim to the currently viewed activity. If David is not in the current activity, an error will occur and no expense will be created. Otherwise, all existing participants of the activity will now owe David a portion of the $100 (left image).
If no activity is currently viewed, an error will occur as there is no description provided to use for automatic activity creation to contain this expense (right image):
-
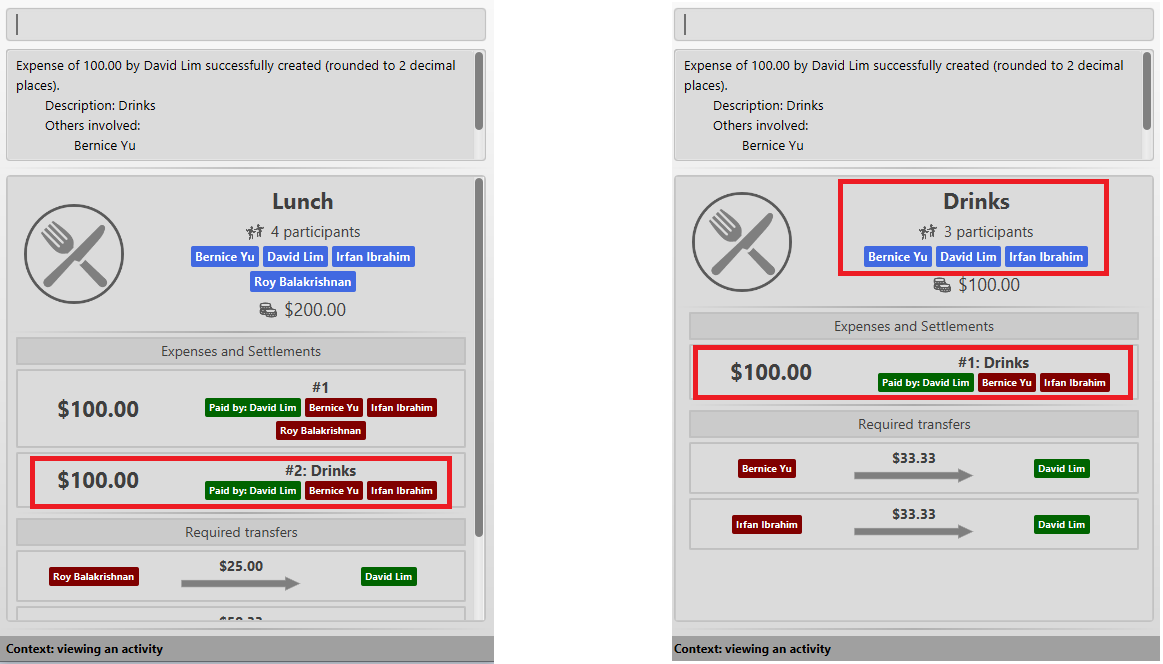
expense p/David e/100 p/Bernice p/Irfan d/Drinks
Adds an expense of $100 to the currently viewed activity by David where Bernice and Irfan are involved i.e. Bernice and Irfan owe David a portion of the $100. This expense will be namedDrinks(left image). If any one of the participants are not in the present activity, then an error will occur and no expense will be created.
Alternatively, if no activity is currently viewed, an activity titledDrinkswill be created to contain this expense. David, Bernice and Irfan will then be added to the activity (right image):
|
It is in fact possible to add an expense where no one else is involved in by specifying that the people involved only include the person who is paying, e.g. expense p/John Doe e/15 p/John Doe d/CabThis adds an expense of $15 by John Doe called Cab where only John himself is involved, thus no one owes anyone anything. This can be used to add an expense simply for recording purposes if desired, though it is not an intended use case for SplitWiser since there is no debt to calculate and resolve.
|
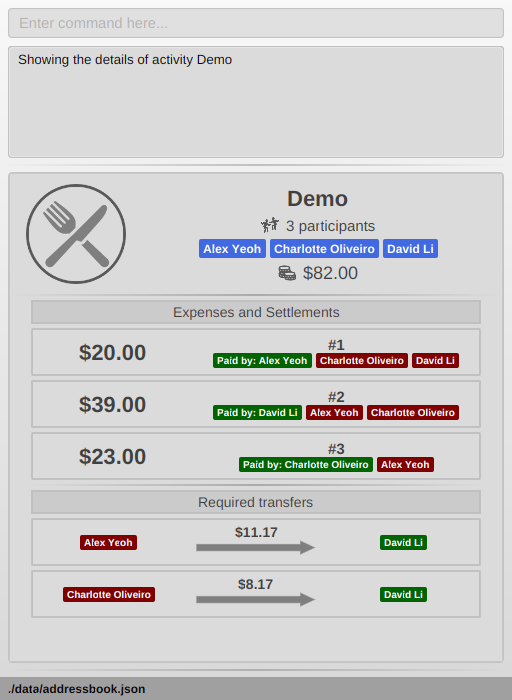
5.9. Settle debts in an activity : settle
Settles the debt between two people within the currently viewed activity.
Specify two people, and optionally an amount AMOUNT_PAID to settle.
There are two options available:
-
AMOUNT_PAIDis not provided: then the command will automatically calculate the minumum needed to settle the debt and use that as the amount. -
AMOUNT_PAIDis provided: the command will use this amount.
The first person specified PERSON1 will pay PERSON2.
PERSON1 and PERSON2 can be any part of the names of the activity participants you wish to target.
Generally it is similar to how you would add an ordinary expense.
If no match is found for any person provided, or if multiple matches are found, the command will do nothing as it is ambiguous.
An entry will be added within the activity display so you can keep track of past payments. These entries will have a generic description tagged to them to make it clear what it is, and they will also be highlighted in a frame to distinguish them from ordinary expenses.
Format: expense p/PERSON1 e/AMOUNT_PAID p/PERSON2
Example run:
-
Go to the activity you wish to modify with the
list a/andviewcommands. You will see something like this:
-
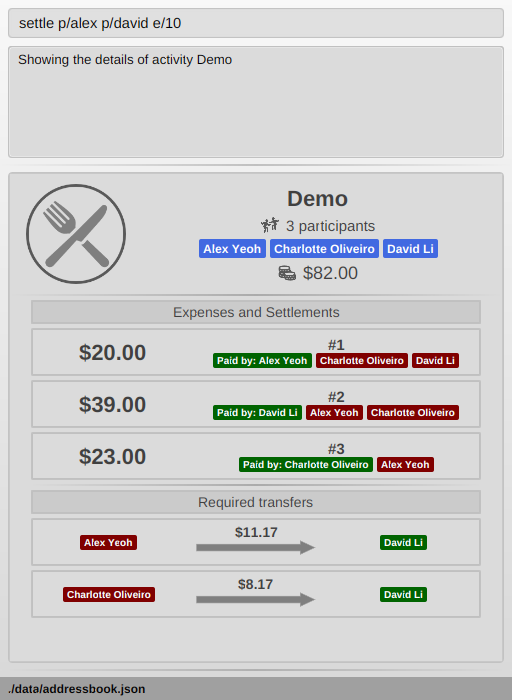
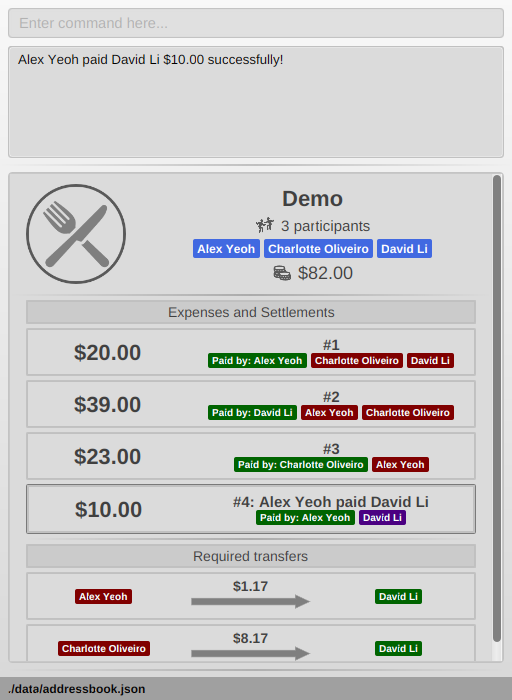
settle p/alex p/david e/10
Adds an settlement to the activity stating that Alex has paid David $10. If Alex owes less than $10 to David, the command will be rejected. In this case it is accepted since Alex owes about $20 or so to David. The two pictures below show what will happen before and after the command. Notice the new expense added, which is also conveniently highlighted.
-
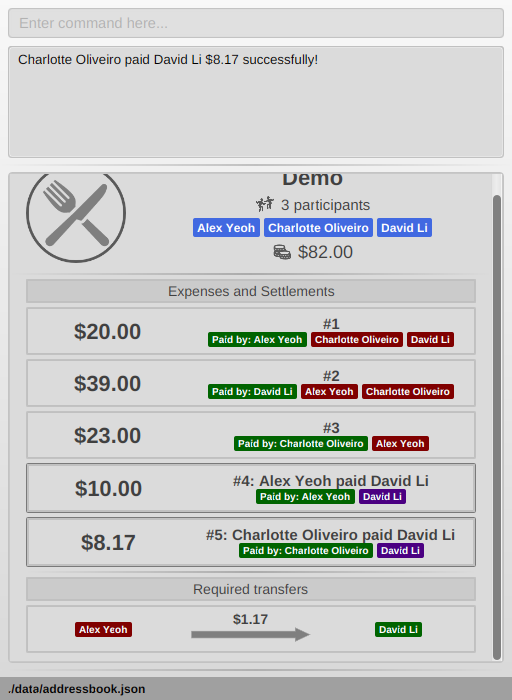
expense p/charlotte p/li
No amount to pay is provided, so it is assumed that Charlotte wants to pay David (Li) as much as is needed to clean their debt. This is what we see:
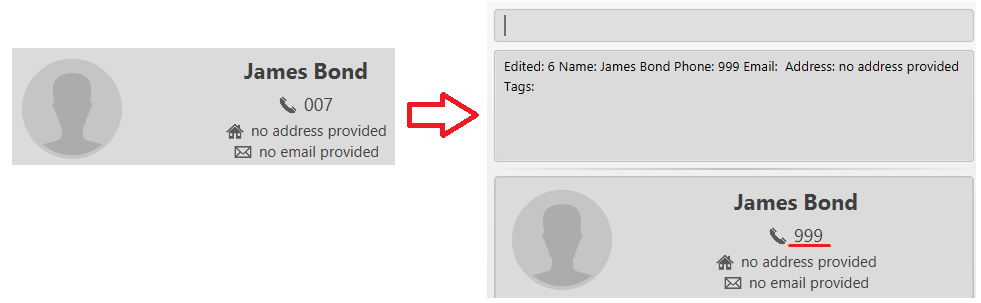
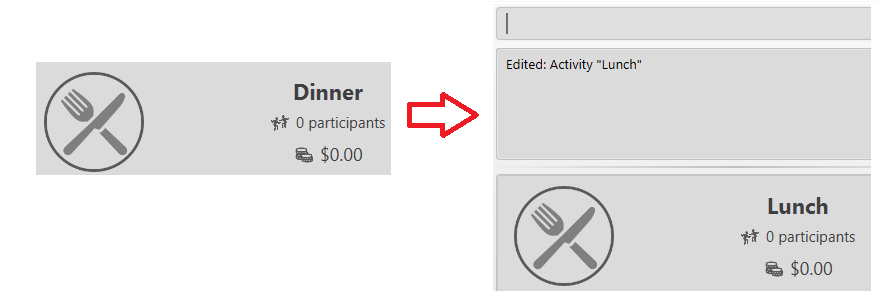
5.10. Edit an existing contact or activity : edit
This command edits some details of the current contact or activity in view. Note that contact names must be unique, so if a specified name already exists in the address book, the edit will not be processed.
Format: edit [n/NAME] [p/PHONE] [e/EMAIL] [a/ADDRESS] [tag/TAG …] for contacts OR edit [t/ACTIVITY_TITLE] for activities.
Examples:
-
edit p/999
Edits the phone number of the current contact in view to999. No changes are made if a contact is not being viewed.
-
edit t/Lunch
Edits the title of the current activity in view toLunch. No changes are made if an activity is not being viewed.
5.11. Finding contacts or activities: find
This command finds contacts or activities whose name or title respectively contain any of the given keywords.
Format: find KEYWORD …
Example:
Suppose that you want to find all the contacts that are called "John".
Step 1: List all contacts in this app by typing in the following command into the command box, and press Enter.
list c/

Step 2: Check that the result box shows the success message, and the bottom display box lists all contacts. This means that you are currently in the "list contact" context.
Step 3: To find all contacts with "John", type in the following command into the command box, and press Enter.

Step 4: Check that the result box shows the success message and the number of matches found, and that the bottom display box shows all matching contacts.
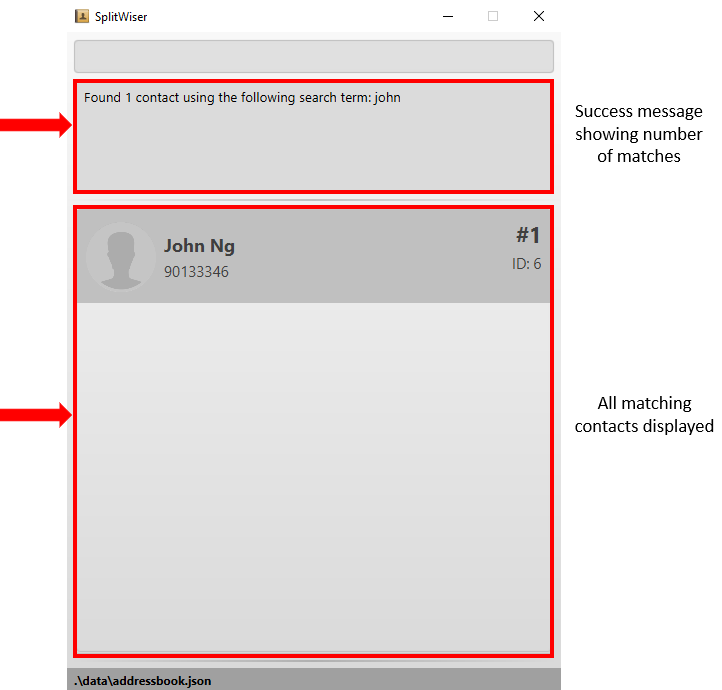
In order to search for activities, replace the command in step 1 with list a/ in order to switch to "list activity" context. |
5.12. Deleting a contact, activity or expense: delete
Deletes the contact/activity/expense at the specified index from the current display.
Format: delete INDEX
If current display is listing contacts e.g. list c/, the contact at that specified INDEX will be deleted if he/she is not involved in any activity.
If current display is listing activities e.g. list a/, the activity at that specified INDEX will be deleted.
If viewing an activity instead e.g. view a/1, it will soft-delete the expense* at that INDEX.
If the current display is not any of the above displays mentioned, error will be thrown.
Examples:
-
delete 2
If viewing the list of contacts, deletes the 2nd person by index if he/she is not involved in any activity. -
delete 1
If viewing the list of activities, deletes the 1st activity by index. -
delete 1
If viewing a particular activity, fades (soft-deletes) the 1st expense by index.
Deletes the entry at the specified INDEX.The INDEX refers to the index number shown in the displayed list of contacts/activities/expenses.The INDEX must be a positive integer 1, 2, 3, …Expenses cannot be completely deleted. It will instead be faded (but still visible) in the activity view. |
5.13. Add variable split expenses to an activity: varexpense (v2.0 only)
Creates a new expense with a list of (contact, amount) pairs and an optional description, and adds it to the currently viewed activity. The very first (contact, amount) pair will represent the person paying and the amount paid. Every subsequent (contact, amount) pair will then represent the cost incurred by each person in this expense.
Format: varexpense p/PERSON e/AMOUNT [d/DESCRIPTION] [(p/PERSON e/AMOUNT) …]
5.14. Assign an activity as a sub-activity: assign (v2.0 only)
Assigns a specified activity by display index as a sub-activity of the currently viewed activity. If no activity is currently being viewed, or the specified index does not correspond to an activity in the list of activities, no change is made.
Multiple activities can be assigned at once.
Format: assign a/ACTIVITY_ID …
Examples:
-
assign 3 5If viewing an activity with title 'Family trip', assigns the activities with display indices 3 and 5 as sub-activities of 'Family trip', if the list of activities contain at least five activities.
5.15. Exiting the program : exit
Exits the program.
Format: exit
6. FAQ
Q: How do I transfer my data to another computer?
A: Install the application on the other computer and overwrite the empty data file it creates with the data file contained in your current SplitWiser folder.
7. Powerusers
Certain features are not included intentionally, as some of them may potentially result in undefined behavior. Hence, everything covered in this section is performed by you in the explicit knowledge that something might break!
7.1. Force deleting expenses
The default behavior for disinvite is to never allow permanant deletion for expenses.
What you will see instead is that it is striked out in the UI.
This is for good reason!
It preserves accountability and transparency.
You can however forcibly delete an expense by editing the data/activitybook.json file if you so incline.
Before anything, find out the ID of the expense that you wish to remove (this is different from the # index shown on the right of the GUI).
Ensure the application is closed, then find the activity in question in the json, and edit the expenses field as you wish.
After restarting you will see that the expense is permanantly removed from the activity. The debts will have been recalculated as though it was never there.
| Deleting an expense does not care about the existing debts caused by that expense! |
7.2. Force disinvite from activity
If a contact is involved in an expense, he/she cannot be removed.
To forcibly remove a contact from an activity, you will have to edit data/activitybook.json.
Before anything, find out the ID of the person that you wish to remove (this is different from the # index shown on the right of the GUI).
You should also be extremely sure that the contact is not involved in any other activities or expenses.
Ensure the application is closed, then find the activity in question in the json, and edit the participants field as you wish.
After restarting you will see that the person is permanantly removed from the activity.
| This operation is very dangerous! The person might be included in expenses or other activities — in that case, an error will be generated and the application will reset. |