By: Team Vortex Since: Sept 2019 Licence: MIT
1. Setting up
Refer to the guide here.
2. Design
2.1. Architecture
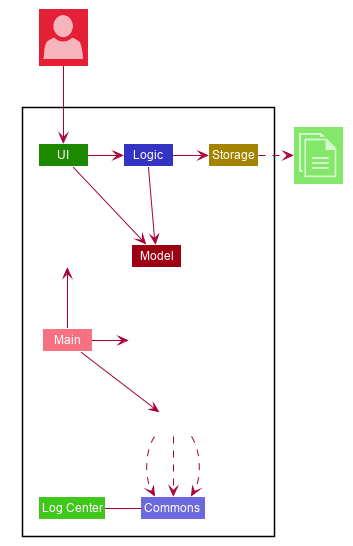
The Architecture Diagram given above explains the high-level design of the App. Given below is a quick overview of each component.
The .puml files used to create diagrams in this document can be found in the diagrams folder.
Refer to the Using PlantUML guide to learn how to create and edit diagrams.
|
-
At app launch: Initializes the components in the correct sequence, and connects them up with each other.
-
At shut down: Shuts down the components and invokes cleanup method where necessary.
Commons represents a collection of classes used by multiple other components.
The following class plays an important role at the architecture level:
-
LogsCenter: Used by many classes to write log messages to the App’s log file.
The rest of the App consists of four components.
Each of the four components
-
Defines its API in an
interfacewith the same name as the Component. -
Exposes its functionality using a
{Component Name}Managerclass.
For example, the Logic component (see the class diagram given below) defines it’s API in the Logic.java interface and exposes its functionality using the LogicManager.java class.
ac
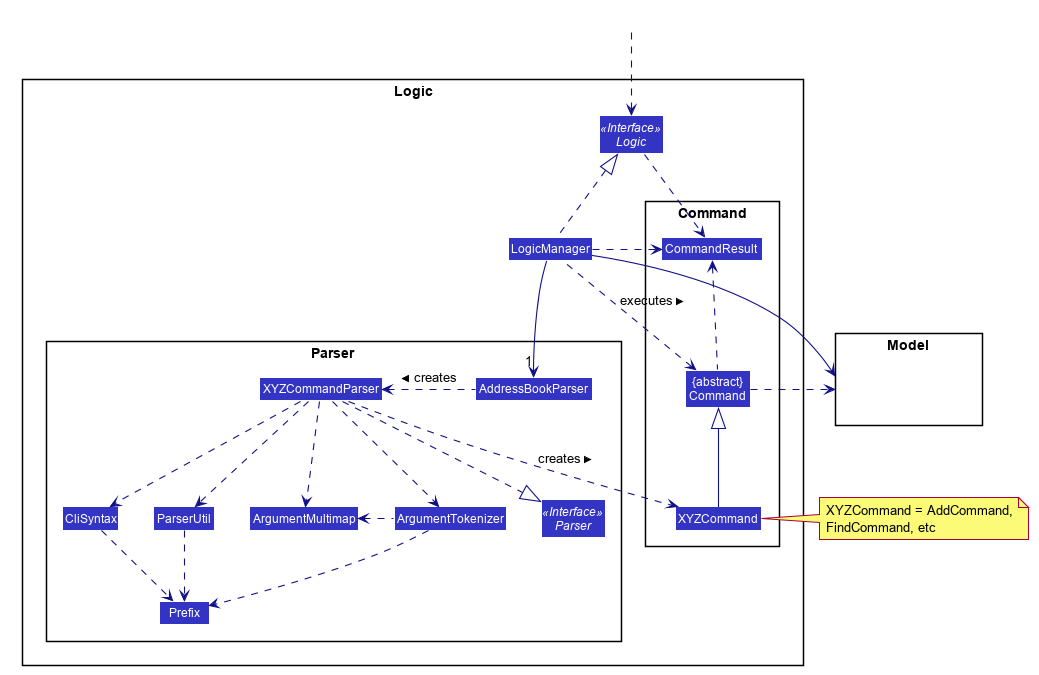
.Class Diagram of the Logic Component
image::LogicClassDiagram.png[]
How the architecture components interact with each other
The Sequence Diagram below shows how the components interact with each other for the scenario where the user issues the command delete 1.
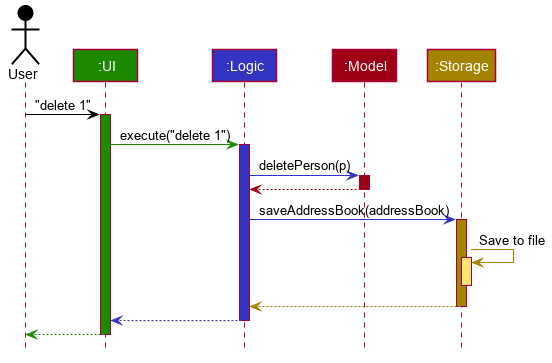
delete 1 commandThe sections below give more details of each component.
2.2. UI component
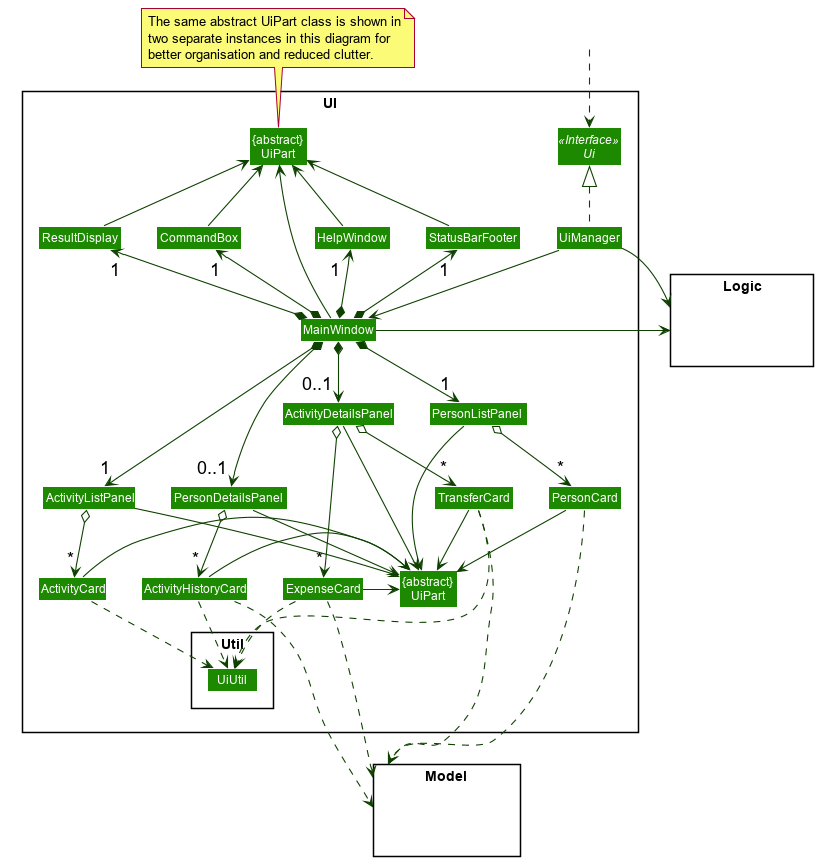
API : Ui.java
The UI consists of a MainWindow class that comprises parts from two categories:
-
Common parts that are displayed regardless of the current application context, e.g.
CommandBox,ResultDisplay,StatusBarFooteretc. -
Contextual parts that are only displayed in the respective application context, e.g.
ActivityListPanel,PersonDetailsPanel.
All of these UI classes, including MainWindow itself, inherit from the abstract UiPart class. The common UI classes are shown above MainWindow in the above class diagram, whereas the contextual UI classes are shown below MainWindow.
All UI classes are built upon the JavaFX GUI framework. The structure of each UI part X is defined in a matching X.fxml file in the folder src/main/resources/view. For example, the layout of the MainWindow is specified in MainWindow.fxml.
To create a visually cohesive and pleasant GUI, custom CSS styling rules were also employed to style each UI part individually. These stylesheets may be found as .css files in the folder src/main/resources/view`.
The UI component,
-
Executes user commands using the
Logiccomponent. -
Listens for some changes to
Modeldata so that relevant UI parts may be re-rendered with the modified data. -
Parses the returned
CommandResultto perform appropriate additional actions, such as exiting the application or switching the contextual part being displayed.-
The behaviour of the
MainWindowpart is further detailed in Section 3.6, “GUI commands: List and View features”.
-
2.3. Logic component
API :
Logic.java
-
Logicuses theAddressBookParserclass to parse the user command. -
This results in a
Commandobject which is executed by theLogicManager. -
The command execution can affect the
Model(e.g. adding a person). -
The result of the command execution is encapsulated as a
CommandResultobject which is passed back to theUi. -
In addition, the
CommandResultobject can also instruct theUito perform certain actions, such as displaying help to the user.
Given below is the Sequence Diagram for interactions within the Logic component for the execute("delete 1") API call.

delete 1 Command
The lifeline for DeleteCommandParser should end at the destroy marker (X) but due to a limitation of PlantUML, the lifeline reaches the end of diagram.
|
2.4. Model component
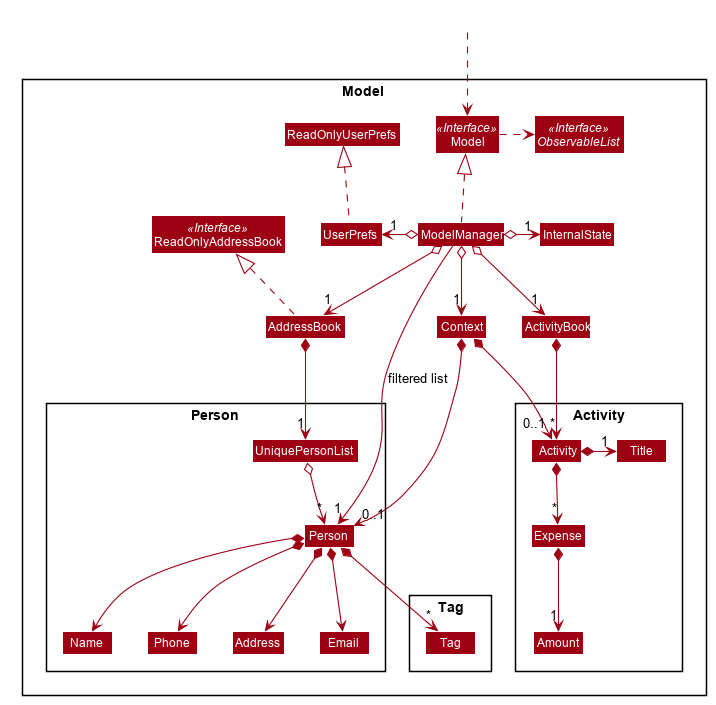
API : Model.java
The Model,
-
stores a
UserPrefobject that represents the user’s preferences. -
stores a
Contextobject that represents the current application context. -
stores a JSON serializable
InternalStateobject in order to keep track of primary key counters for bothPersonandActivity. -
stores the Address Book and Activity Book data.
-
exposes an unmodifiable
ObservableList<Person>that can be 'observed' e.g. the UI can be bound to this list so that the UI automatically updates when the data in the list change. -
does not depend on any of the other three components.
As a more OOP model, we can store a Tag list in Address Book, which Person can reference. This would allow Address Book to only require one Tag object per unique Tag, instead of each Person needing their own Tag object. An example of how such a model may look like is given below.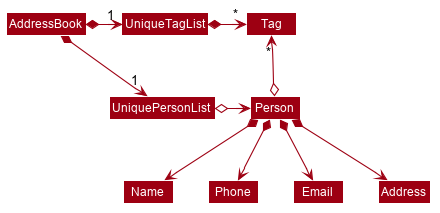
|
Activity and Expense keeps track of the people involved by storing IDs instead of objects, hence there is no direct dependency on the Person class.
|
Strictly speaking, Context only stores a single Optional<Object>, which can only be an Activity or Person. Hence, it is not actually possible for Context to contain both and Activity and Person, unlike what Figure 7 might suggest.
|
2.5. Storage component

API : Storage.java
The Storage component,
-
can save
UserPrefobjects in json format and read it back. -
can save the Address Book data in json format and read it back.
2.6. Common classes
Classes used by multiple components are in the seedu.addressbook.commons package.
3. Implementation
This section describes some noteworthy details on how certain features are implemented.
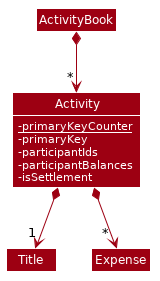
3.1. Activity class
Activity is a class used to store activities and their details. It contains the following information:
-
Primary Key
Each Activity has a unique primary key used by external classes to identify and access them, without unnecessary dependencies.
-
Title
Title of the activity is stored using Title, which runs validations to ensure that the title is valid. Currently, the only restriction for the title is that it can’t be blank.
-
Participants
Participants are saved internally under participantIds, which only stores the primary key of Person involved.
-
Expenses incurred by this activity
Expenses are stored as Expense. Refer to Section 3.3, “Expense class” for more details.
-
Outstanding balance for each participant
The balance of each participants are stored internally under participantBalances.
All Activity objects are stored in ActivityBook.
The following class diagram describes the implementation of Activity.
3.1.1. Design Considerations
Aspect: Storage of participants
-
Alternative 1 (current choice): Only storing the primary key of participants
-
Pros: Minimizes dependency and potential bugs.
-
Cons: More difficult for external classes to retrieve participant objects if necessary.
-
Reason for choice: Storing entire object can potentially cause bugs, as there are no mechanisms to ensure the consistency of data between
Personobject inActivityandAddressBook.
-
-
Alternative 2: Storing the entire
Personobject inside theActivity.-
Pros: Easier to implement. Object can be easily retrieved when necessary.
-
Cons: Creates extra dependency between classes. More prone to error.
-
3.2. Create activity feature
Mechanism to create activity is facilitated by Activity.
It extends AddressBook with an ActivityBook, stored internally as an activityList. Additionally, it implements the following operation:
-
Activity()— Constructor used to create a newActivity.
All Activity models are stored inside ActivityBook.
When creating an activity, the title must be specified. It is optional to include participants, as they can be invited separately using the invite command. Refer to Section 3.8, “Invite/Disinvite feature” for more information.
Adding of participant uses both exact-match and keyword-based search. First, the search term passed in is used to find an contact with an exact matching name. If no exact match is found, the search term is split into keywords via whitespace. Obtained keywords are then used to search the AddressBook for a matching person. The person is added in as a participant only if there is one exact match. Otherwise, a warning message will be displayed and no participant will be added for this set of keywords.
The aforementioned mechanism was applied to minimize friction for users in using this feature. In early stages of development, it was concluded that making users type in the full name every time was seen as overly tedious. Making use of keyword-based search ensures that the users will only have to type in minimum amount of information to add a person.
Exact matching is always used first to overcome a specific edge case where a contact could not be added, if its name was a substring of another contact’s name. Using exact-matching before applying keyword-based matching helps avoid this problem.
Here is a sample use case in creating an expense:
Step 1. The user launches the application for the first time. The SplitWiser will be initialized with the initial address book and activity book state.
Step 2. The user executes activity t/Breakfast p/David command to create an activity named Breakfast in the activity book, with David as a participant.
Step 3. The user executes activity t/Lunch p/Alex p/David command to create an activity named Lunch in the activity book. In this case, as there are two contacts with the name "Alex", this search term is considered invalid, and only David is added into the Lunch activity as a participant.
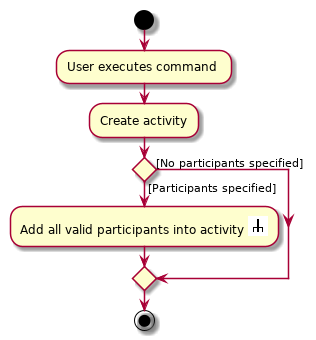
The following sequence diagram demonstrates how creating activity works:
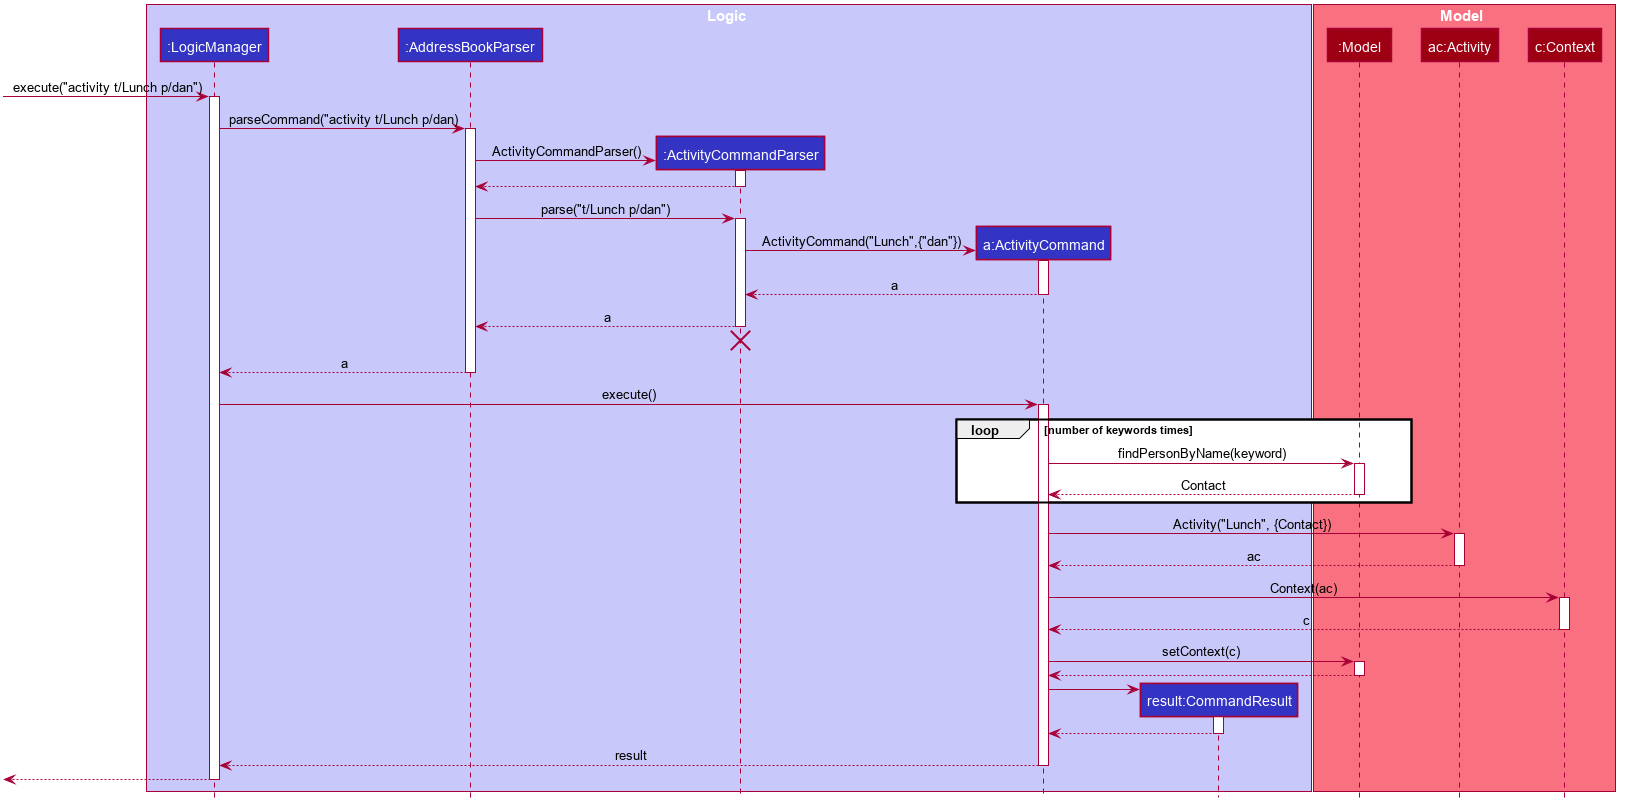
The lifeline for ActivityCommand should end at the destroy marker (X) but due to a limitation of PlantUML, the lifeline reaches the end of diagram.
|
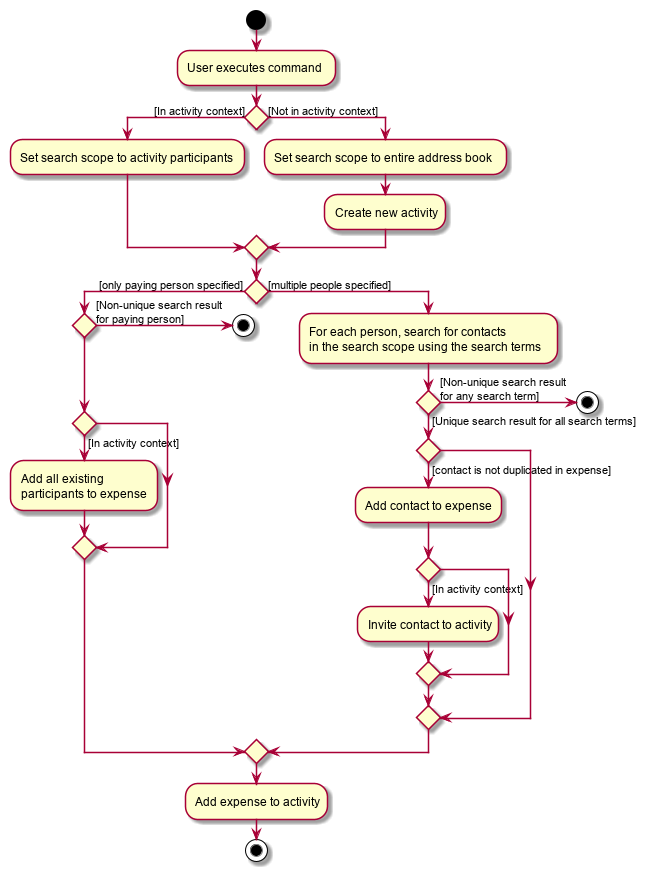
The following activity diagram encapsulates the high level logic of the create activity operation.
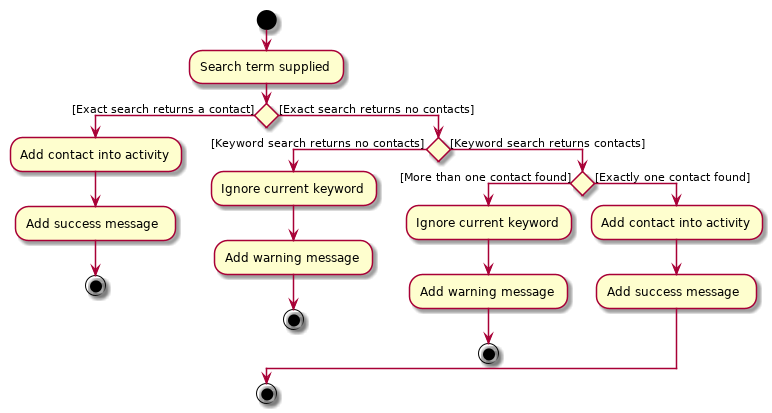
The following activity diagram encapsulates the high level logic of finding the correct contact to add as participant, for each keyword supplied.
3.2.1. Design Considerations
Aspect: Finding the correct contact to add
-
Alternative 1 (current choice): Users can use keywords to specify the contact to be added.
-
Pros: Improves usability.
-
Cons: Difficult to implement. Necessary to handle multiple edge cases.
-
Reason for choice: Forcing users to specify exact full name was deemed to be too tedious, especially when adding multiple participants.
-
-
Alternative 2: Users must type in the exact full name of the contact to be added.
-
Pros: Easy to implement. Low possibility of bugs.
-
Cons: Significantly decreases usability of the application.
-
3.3. Expense class
Expense is a class used to record expense information. It contains the following information:
-
Paying person
Each expense must be paid by someone, which is recorded as personId internally. As the name suggests, only the primary key of the Person paying is stored.
-
Other involved people
Each expense also involves some people who will be taken to owe money to the paying person. This is recorded as involvedIds[] internally, which only stores the primary key of each involved person.
-
Amount
The amount of money spent. The value of an Amount is stored as a double, and must be non-negative. Refer to Appendix F, Limitations of double for a more in depth analysis the numerical errors that may arise due to the limitations of this representation.
-
Description
The description of an expense. The description may be blank if the user chooses to not describe what it is about.
-
Deleted flag
This flag tracks whether an expense has been marked as deleted or not, and is stored as a boolean value isDeleted. For accountability purposes, we do not allow an Expense to be deleted from an Activity entirely, and instead use this flag to keep track of it. Expenses can only be fully deleted by deleting the entire activity.
-
Settlement flag
SplitWiser supports 2 main types of "expenses": one is an actual expense, and the other is a transaction between people to pay off debts. The latter is what we call a settlement, and is indicated by the boolean isSettlement.
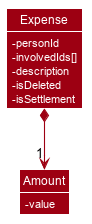
The following diagram describes the structure of the Expense class:
3.3.1. Design considerations
Aspect: How to actually represent an Expense
-
Alternative 1: An expense is represented by a paying person and an amount. Everyone in the activity is then taken to owe the paying person an equal portion of the paid amount.
-
Pros: Extremely simple to use.
-
Cons: Overly idealised and simplified and assumes that everyone is involved in every expense. This severely hinders its utility in real scenarios as this is unable to account for even simple deviations in debt patterns.
-
-
Alternative 2 (current choice): An expense is represented by a paying person, amount, and a list of people involved. Everyone who is specified to be involved then owes an equal portion of the paid amount to the paying person.
-
Pros: Reasonable flexibility as it enables a wide range of possible expense sharing combinations.
-
Cons: Forces equal split among participants in the involved list, which is still going to result in limited utility in some real scenarios. A simple example would be that a group of people can have a meal together but each person’s meal would cost a different amount.
-
Reason for choice: Although the above con can be a very real issue from a user’s standpoint, we believe this is the best balance between flexibility and usability.
-
-
Alternative 3: An expense is represented by a paying person, an amount, a list of paying people and the amount each person should pay back the paying person.
-
Pros: Ultimate flexibility and addresses the con above.
-
Cons: Significantly complicates the backend management of expenses. While this is something that will definitely be addressed in future versions of SplitWiser (e.g. adding a new
varexpensecommand that enables this), we opted for a simpler version ofExpensedue to time constraints. The areas that need to be taken into consideration include (but may not limited to):-
Design of the command for the user in a way that is intuitive
-
Managing the event that the amount list does not add up to the amount paid
-
GUI representation of the more generalised version of
Expense
-
-
3.4. Create expense feature
The mechanism to create expenses is facilitated by Expense. Each Activity stores a list of Expense called expenses, representing the expenses incurred in the course of this activity.
When creating an expense, an amount and at least one person (the paying person) must be specified, and information about an expense cannot be modified once it is created. The only exception to this would be to delete an expense, but expenses also cannot be un-deleted once marked as deleted.
In terms of the name searching logic to actually identify who is involved, it is identical to that which is used in the creation of activities (see Section 3.2, “Create activity feature”), but with a few key differences:
-
The expense will only be created if all sets of keywords result in a unique match. For instance, if the user specifies
p/John Doe p/Mary p/James, but only the keywordJamesdoes not successfully identify a unique person, then the entire expense will not be created. -
The search scope is contextual. If creating an expense outside an activity context, it will search for matches in the entire Address Book. However, in an activity context, it will only search for matches among existing activity participants.
Here, it is important to realise that duplicating the name searching logic ensures a consistent user experience, as the user has no reason to expect that the search behaviour would be different. For example, if john was successfully used to identify a contact named John Doe when creating an activity, the user has no reason to expect that john would not be able to identify John Doe for an expense.
Here is a sample use case in creating an expense:
Step 1. The user launches the application for the first time. The SplitWiser will be initialized with the initial address book and activity book state.
Step 2. The user executes activity t/breakfast p/Jo p/Bob p/Alice command to create an activity named breakfast with 3 participants added to the activity. The context is then switched to this new activity.
Step 3. The user executes expense p/Jo e/10 to indicate that Jo paid $10 for something (unnamed as description is not specified) that is shared by everyone i.e. Bob and Alice. This happens because the default behaviour for expense is to assume everyone is involved if no one else is specified explicitly. expense command calls Activity#addExpense() and adds the new expense into the activity. The debt algorithm will then instantly recompute the debt matrix (see Section 3.5, “Debt simplification algorithm”) for the activity, and store the expense object inside the activity’s expense list (i.e. expenses).
The following sequence diagram shows how the expense adding operation works:
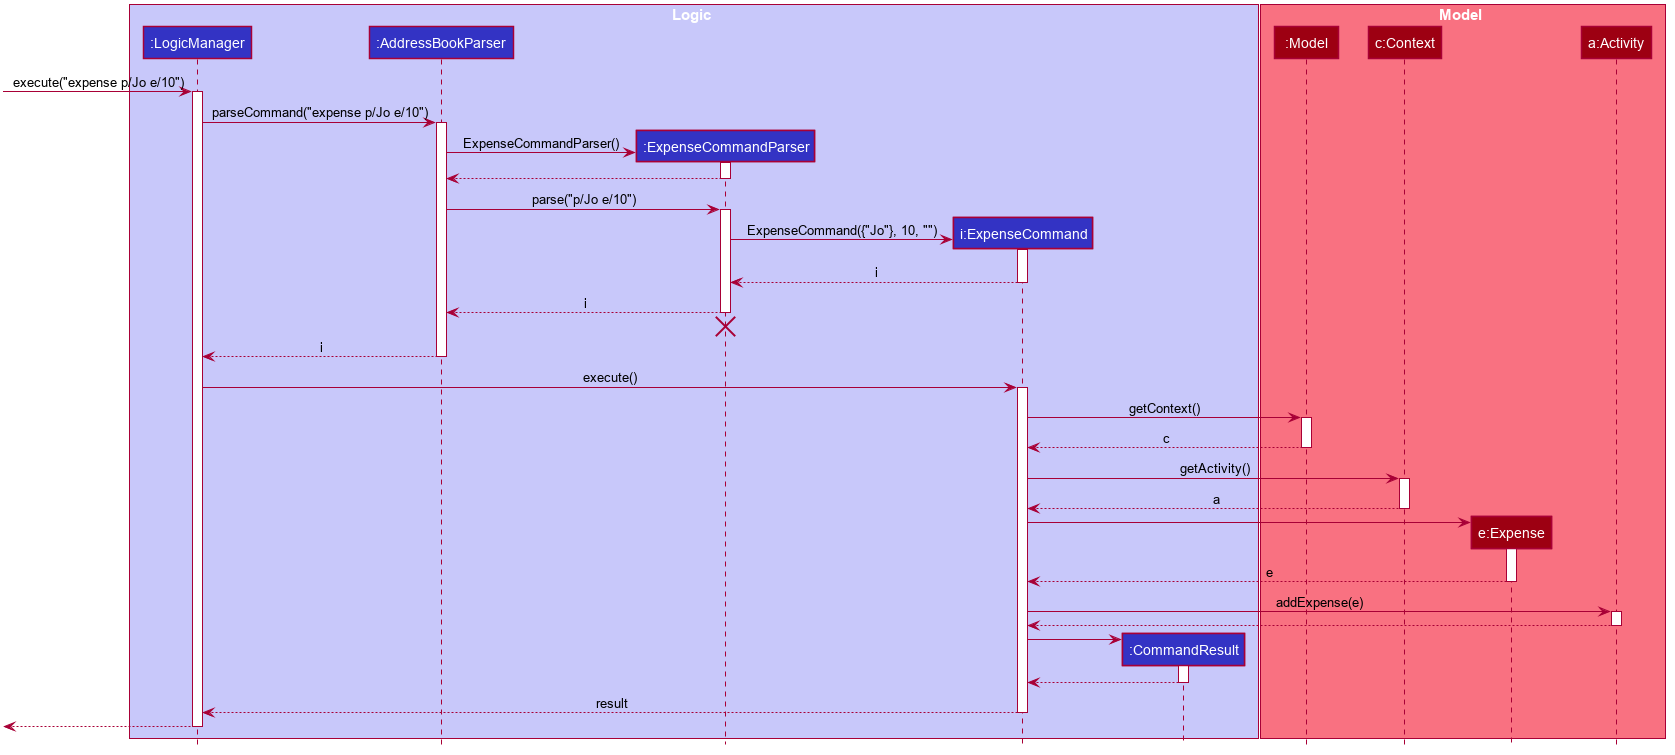
The lifeline for ExpenseCommand should end at the destroy marker (X) but due to a limitation of PlantUML, the lifeline reaches the end of diagram.
|
The following activity diagram encapsulates the high level logic of the expense adding operation:
3.5. Debt simplification algorithm
The algorithm is inspired by this paper.
We can gurantee the removal of all needless payments. The amount of money each person has to hand is minimized. We are unable to minimize the number of transactions made. The paper gives an overview of that problem and why it is NP-complete (subset-sum).
3.5.1. Operation details
The amounts each person owes to another is represented by a graph in an adjacency matrix. The algorithm represents the payments to be made as a matrix. There are some other data structures to facilitate its operation, but the code is generally well commented and they are not major player so we will skip them.
To rephrase our gurantee in this context will be: we want to minimize weights. That is, the total amount of money someone will have to touch is minimized.
The lower bound for the amount someone has to handle is the balance. We create a balance sheeet for the users which is expanded as people enter the activity. Each expense added, the algorithm retrieves from it: * who is involved, * who paid, * how much has been paid, splits everything correctly, and updates all the data structures appropriately.
Someone’s balance is positive if he received more than he owes. Then, a negative balance indicates them lending more than they received. The algorithm simply finds any two people whose balances have opposing signs. It is unimportant what is the magnitude of their balances (we do not need to take them in any order). What then happens is then the person with the smallest magnitude of balance neutralizes his balance by paying or being paid by the other party. The algorithm terminates when all balances are 0.
3.5.2. Proof of optimality
This is a short proof of optimality since we want it to be called "algorithm", not "heuristic".
In essence what we are constructing is a bipartite graph. The algorithm never allows someone who owes to be paid, or someone who is owed to pay even more. Hence we can classify all nodes into those with leaving edges (payers) and those with entering edges (payee).
In a bipartite graph the amount each person handles is minimized. To see why, we have to keep in mind that the algorithm always neutralizes one of the parties' balance. That is to say, we will not be left with the case where someone who could pay off all his debts "overpaying". In such a case, someone will then have to pay him back, which means it is no longer bipartite.
3.5.3. Time and Space complexity
We take O(N^2) space and O(N) time. Updating of the balance sheet and matrices by the expense command is performed in O(1) time.
3.5.4. Design Considerations
Aspect: Precision
-
Alternative 1 (current choice): Just use
double.-
Pros: Easy, straightforward, good enough.
-
Cons: Floating point precision might stack up.
-
Reason for choice: For everyday purposes it is highly unlikely currencies (normally at most 2 decimal points) require any higher precision. This is for normal friends, not stockbrokers.
-
-
Alternative 2: Implement a
Rationalclass for rational numbers.-
Pros: Guranteed precision.
-
Cons: Seems overkill and needlessly over-engineered.
-
3.6. GUI commands: List and View features
3.6.1. Introduction
To reduce the amount of typing required of the user, it was decided that the app would support contextual commands that operate differently based on the data the user was currently viewing.
The List and View commands (collectively, GUI commands) were thus introduced to enable the user to switch between different views (panels) of the app, of which there are four:
-
Contact list (
PersonListPanel) - displays brief information (e.g. name, mobile number) of every tracked contact -
Activity list (
ActivityListPanel) - displays brief information (e.g. title) of every tracked activity -
Contact details (
PersonDetailsPanel) - displays full details of a specific contact, including that contact’s activity history -
Activity details (
ActivityDetailsPanel) - displays full details of a specific activity, including all expenses, settlements and required transfers
These mechanism of GUI commands is facilitated by a combination of three classes, MainWindow, Model and Context.
3.6.2. Context class
Context is an immutable utility class introduced to describe the nature of the current view of the app. It stores state information about the current ContextType and an optional Object of interest, and is essential for the UI, Model and Logic components to maintain a consistent
A Context may be instantiated in one of three ways:
-
invoking the factory method
newListContactContextornewListContactContext, which creates a newContextof typeLIST_ACTIVITYorLIST_CONTACTrespectively -
invoking the constructor with an
Activity, which creates a newContextof typeVIEW_ACTIVITYwith that activity -
invoking the constructor with a
Person, which creates a newContextof typeVIEW_CONTACTwith that contact
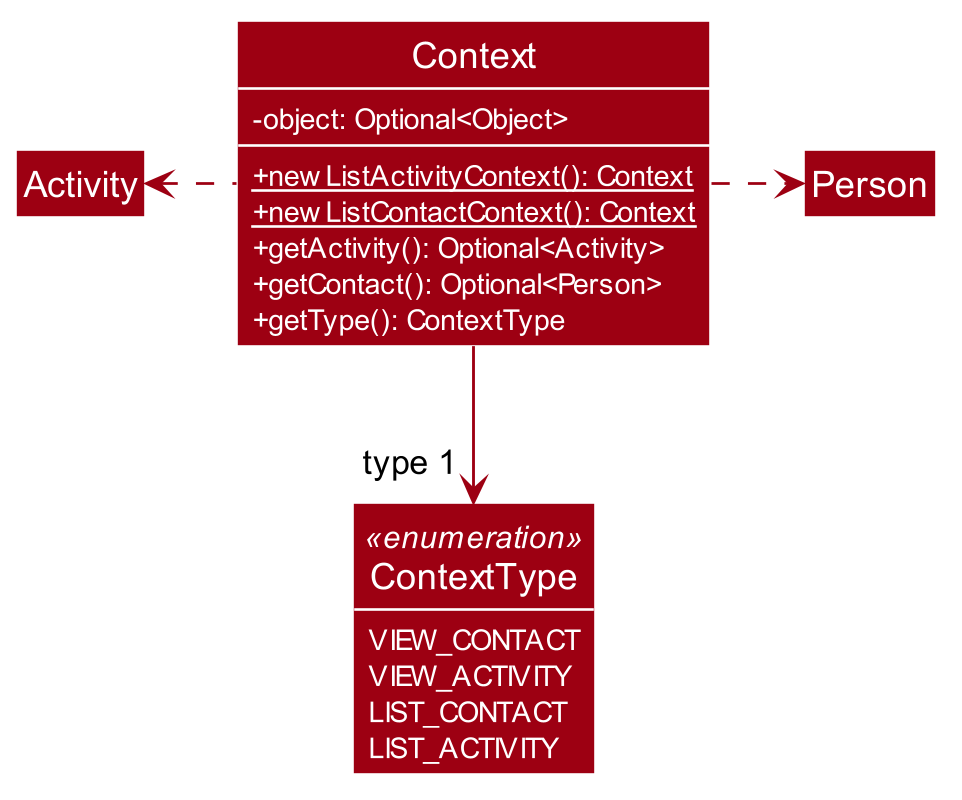
Context class and ContextType enumThe Context class exposes relevant getter methods Context#getType, Context#getActivity and Context#getContact. This enables contextual commands and the UI to retrieve the Activity or Person of interest, thus supporting contextual behaviour of the UI and other commands.
During the execution of any command that changes the active view of the app, a new Context is created, with the relevant Activity or Person, if any. The command then updates the Model with the method Model#setContext.
The updated Context of the Model is then wrapped as part of the CommandResult and returned to the MainWindow, which prompts the UI to perform additional actions.
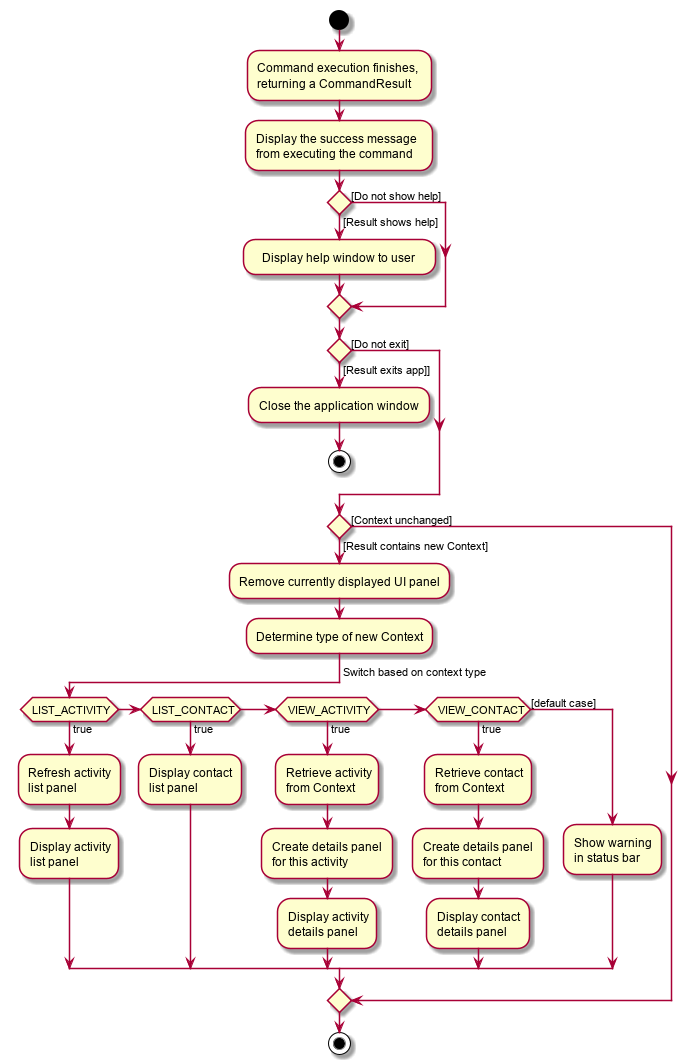
3.6.3. UI context switching
After executing a command successfully, the MainWindow receives a CommandResult, which it uses to determine if any additional actions need to be performed.
If the CommandResult contains a Context, then MainWindow switches the currently displayed panel out for the appropriate panel specified by the ContextType. The following activity diagram encapsulates the additional actions that may be performed as a result of MainWindow parsing the CommandResult.
3.6.4. List feature
During execution, the List command creates the specified Context (either of type LIST_ACTIVITY or LIST_CONTACT). It then updates the Model with the new Context, alongside the FilteredList of Activity or Person respectively.
As MainWindow observes both FilteredList, JavaFX will automatically re-render the contained card entries when the respective list undergoes structural changes. The updated Context is then returned to MainWindow via the CommandResult, where it switches to displaying the specified list.
Given below is an example usage scenario of a user intending to view the list of activities.
Step 1. The user launches SplitWiser for the first time, which defaults to displaying the list of contacts.
Step 2. The user executes list a/ to prompt the app to display the full list of activities.
The following sequence diagram demonstrates the role of the Logic and Model components in the execution of GUI commands. The role of the UI component is detailed in Section 3.6.3, “UI context switching”.
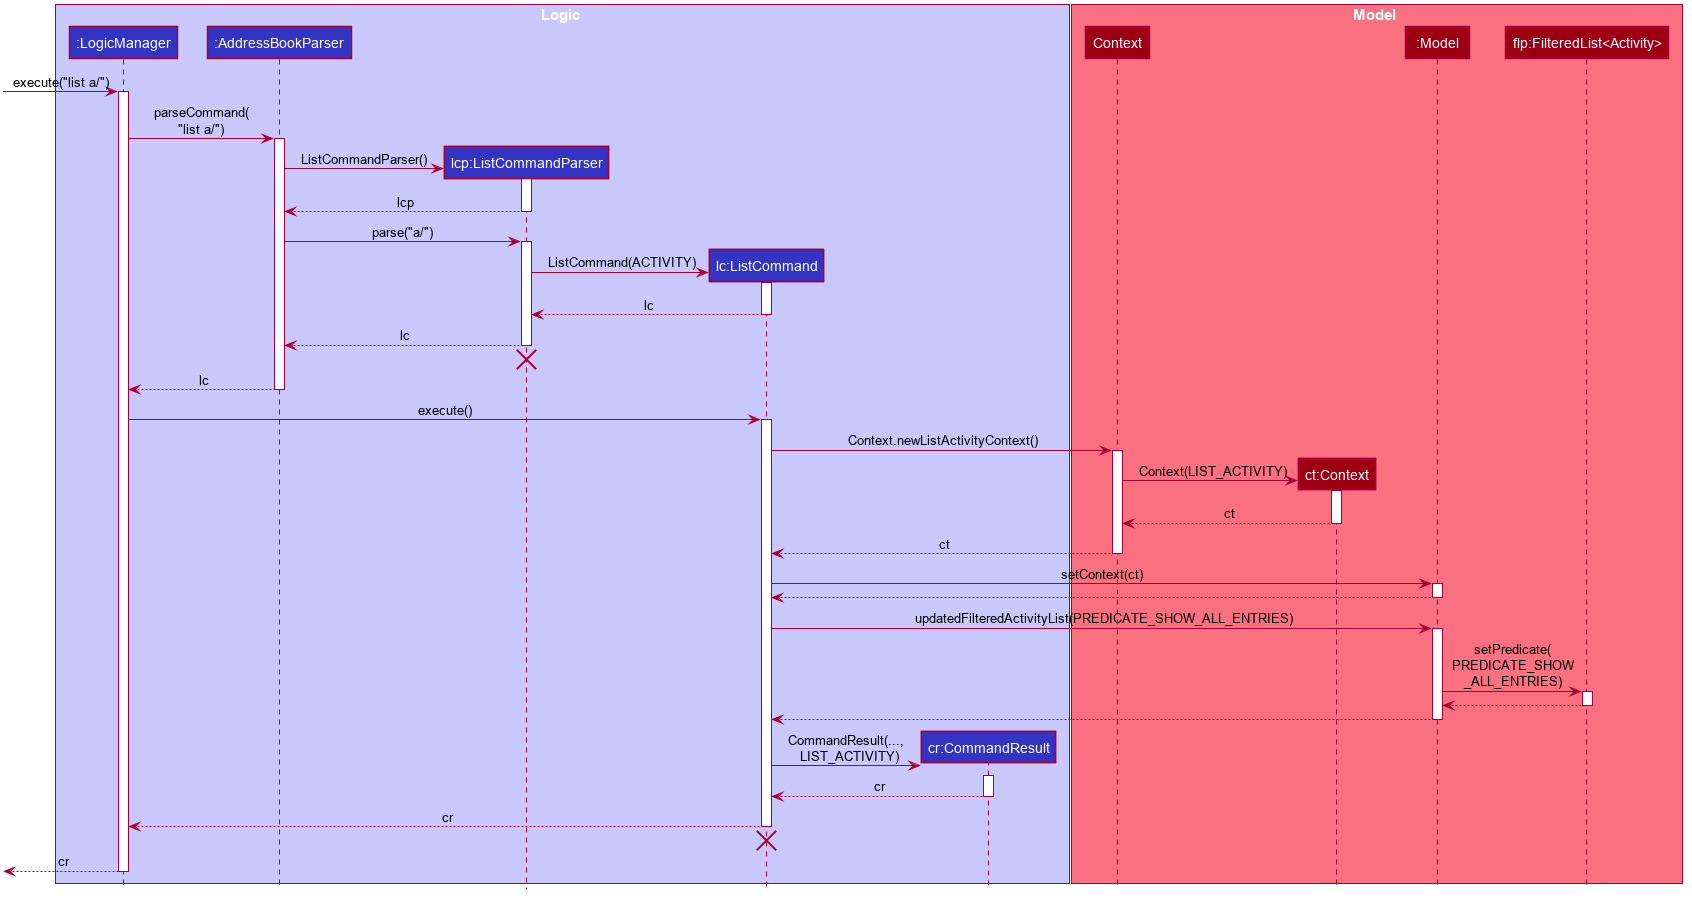
The lifeline for ListCommand and ListCommandParser should end at the destroy marker (X), but due to a limitation of PlantUML, the lifeline reaches the end of the diagram.
|
3.6.5. View feature
The View feature is intended to be used in tandem with the List feature, and displays the full details of the entry at a specified display index of the specified list. Note however, this takes into account the filter applied on the specified list, e.g. from the Find feature.
During execution of the View command, a new Context is created, along with the Person or Activity to be viewed, obtained from the Model. The rest of the execution follows that of the List command.
Given below is an example usage scenario of a user intending to view the second activity.
Step 1. The user launches SplitWiser for the first time, which defaults to displaying the list of contacts.
Step 2. The user executes list a/ to prompt the app to display the full list of activities.
Step 3. The user executes view a/2 to view the full details of the second activity, which succeeds if the list contains two or more activities.
3.6.6. Design considerations
Aspect: representing the current context state
-
Alternative 1 (current choice): Creating an immutable
Contextclass as a state container to store the appropriate information.-
Pros: Lightweight; context state can be easily passed between components that require access, as it is encapsulated entirely within
Context. -
Cons: Harder to implement.
-
-
Alternative 2: Storing the
Contextstate in a designated central component, e.g. theModelManager, and exposing relevant methods to other components.-
Pros: Trivial to implement.
-
Cons: Tightly couples all components that require access to the context state to the central component, complicating testing.
-
3.7. Find feature
The find mechanism is facilitated by the combination of three classes MainWindow, Model and Context.
Context is an immutable utility class that describes the nature of the current view of the app. Refer to Section 3.6.4, “List feature” for more information about Context.
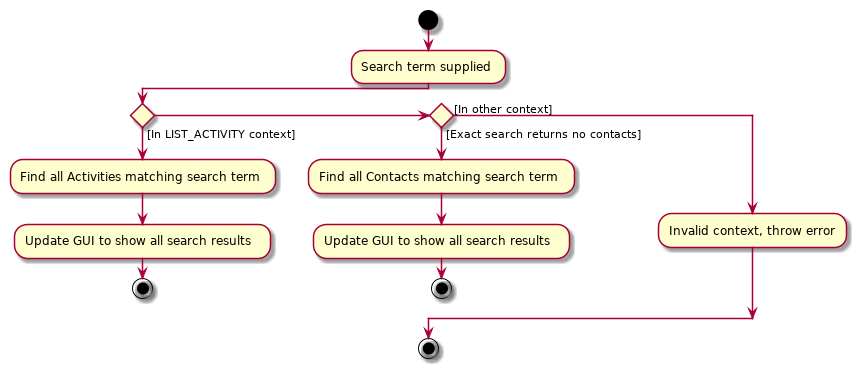
During execution, the Find command checks the current Context from Model. If the current context is LIST_ACTIVITY, the command will search for Activity using the supplied search terms. If the current context is LIST_CONTACT, the command will search for Contacts using the supplied search terms. Otherwise, the command is used on invalid context and will throw an error. If the command is executed in a valid context, it will update the FilteredList to contain only the matching results. As MainWindow tracks both FilteredList, JavaFX will automatically re-render the contained card entries when the respective list undergoes structural changes.
The Find command uses keyword-based matching to search for the correct results. If any of the keywords in the search term matches the title/name of the activity/contact, it will be included in the search results.
Given below is an example usage scenario of a user intending to find a specific activity.
Step 1. The user launches the SplitWiser application for the first time, which defaults to displaying the list of contacts.
Step 2. The user executes the command string list a/ to prompt the app to display the full list of activities.
Step 3. The user executes the command string find keven to prompt the app to search for all activities that contains the word "keven" in the title.
The following activity diagram encapsulates the high level logic of the find operation.
3.7.1. Design Considerations
Aspect: How to specify search type (Activity/Contact)
-
Alternative 1 (current choice): Rely on current context to decide which type of object to search for. Only works when in either of the list context.
-
Pros: More intuitive for user, since the find command searches for the current type of object being viewed. Less typing is needed if user wants to continuously search in the same context.
-
Cons: Harder to implement, extra dependencies with
Contextclass. -
Reason for choice: Users are more likely to carry out multiple searches, especially when creating an Activity and searching for correct contacts to add.
-
-
Alternative 2: Pass in an extra argument to specify what type of object one is looking for.
-
Pros: Easier to implement, reduced dependency.
-
Cons: Command gets less user-friendly and longer. Successive find command gets tedious to implement.
-
3.8. Invite/Disinvite feature
3.8.1. Implementation
The invite/disinvite mechanism is facilitated by Activity.
It extends AddressBook with an ActivityBook, stored internally as an activityList. Additionally, it implements the following operations:
-
Activity#invite()— Invites a person to the activity. -
Activity#disinvite()— Disinvites a person from the activity.
These operations are exposed in the Activity class as Activity#invite() and Activity#disinvite() respectively.
Given below is an example usage scenario and how the invite/disinvite mechanism behaves at each step.
Step 1. The user launches the application for the first time. SplitWiser will be initialized with the initial address book and activity book state.
Step 2. The user executes activity t/breakfast p/David command to create an activity named breakfast with David as the sole participant which is stored in the activityList.
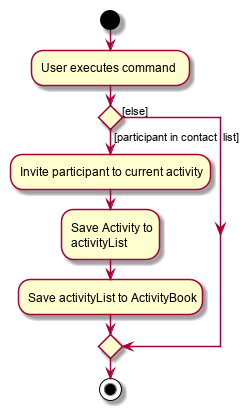
Step 3. The user executes invite p/Louis p/Mary… to invite more participants into the current viewed activity. The invite command calls Activity#invite() which then modifies the activityList with the new participants and is stored in the ActivityBook.
The following sequence diagram shows how the invite operation works:

The lifeline for InviteCommand should end at the destroy marker (X) but due to a limitation of PlantUML, the lifeline reaches the end of diagram.
|
Step 4. The user decides that inviting some contacts was a mistake or they has not been involved in any of the expenses in the activity. Hence the user decides to remove them from the activity by executing the disinvite command.
Step 5. The user executes disinvite p/Louis p/David … to remove participant(s) from the current activity. The disinvite command calls Activity#disinvite() which then modifies the activityList and is stored in the ActivityBook.
| The sequence diagram for the disinvite operation is omitted as it is similar to the invite operation. |
The following activity diagram summarizes what happens when a user executes an invite command:
| The activity diagram for the disinvite command is omitted as it is similar to the invite operation. |
3.8.2. Design Considerations
Aspect: How invite & disinvite executes
-
Alternative 1 (current choice): Contextual based invite/disinvite based on current viewed activity.
-
Pros: More user-friendly. User does not have to keep specifying which activity to invite the participants to each time an invite command is made.
-
Cons: Harder to implement. Have to consider which activity to invite the participants to based on the current viewed activity.
-
-
Alternative 2: Invite/disinvite based on user specifying the activity number.
-
Pros: Easy to implement.
-
Cons: Have to keep retyping activity number if multiple invites/disinvites are needed.
-
Aspect: Data structure to support the invite/disinvite commands
-
Alternative 1 (current choice): Use a list to store the participant’s ID in the activity instead of participant’s name.
-
Pros: Easy for new Computer Science student undergraduates to understand, who are likely to be the new incoming developers of our project.
-
Cons: Have to map participant’s ID to participant’s name. Hard to search for participant’s specific ID when given name.
-
-
Alternative 2: Use list to store participants instead of ID
-
Pros: Easy to implement. Reuse what is already in the codebase and we do not need to create additional Unique ID key for each participant to identify them.
-
Cons: Might create duplicate person object when reading from multiple json files if not implemented properly.
-
3.9. Delete feature
3.9.1. Implementation
The delete mechanism is facilitated by AddressBook, ActivityBook, as well as Activity.
The items that will be deleted can be contact/activity/expense depending on your current display.
Given below is an example usage scenario and how the delete mechanism behaves at each step.
Step 1. The user launches the application for the first time. SplitWiser will be initialized with the initial address book and activity book state.
Step 2. The user executes list c/ command to display list contacts screen.
Step 3. The user executes delete 1 to delete the contact at the first index, he/she will be deleted if he/she is not involved in any activity.
Step 4. The user executes list a/ to display list activities screen.
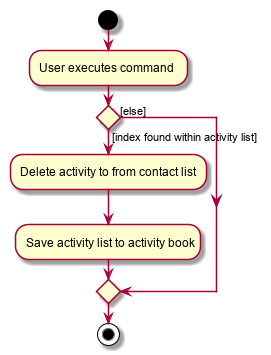
Step 5. The user executes delete 1 again, but this time the activity at the first index will be deleted instead.
Step 6. The user views an activity at the second index using view a/2
Step 7. The user executes delete 1 again, but this time the expense at the first index will be soft deleted instead.
The following activity diagram summarizes what happens when a user executes a delete command for deletion of activity:
| The activity diagram for deletion of expense and contact are omitted as they are similar to the deletion of activity. |
3.9.2. Design Considerations
Aspect: How delete executes
-
Alternative 1 (current choice): Contextual based delete of contact/activity/expense based on current displayed screen.
-
Pros: More user-friendly. User does not have to keep specifying what field to delete.
-
Cons: Harder to implement.
-
-
Alternative 2: Delete based on user specifying which field to delete.
-
Pros: Easy to implement.
-
Cons: Have to keep retyping the field for deletion which is inconvenient.
-
3.10. Logging
We are using java.util.logging package for logging. The LogsCenter class is used to manage the logging levels and logging destinations.
-
The logging level can be controlled using the
logLevelsetting in the configuration file (See Section 3.11, “Configuration”) -
The
Loggerfor a class can be obtained usingLogsCenter.getLogger(Class)which will log messages according to the specified logging level -
Currently log messages are output through:
Consoleand to a.logfile.
Logging Levels
-
SEVERE: Critical problem detected which may possibly cause the termination of the application -
WARNING: Can continue, but with caution -
INFO: Information showing the noteworthy actions by the App -
FINE: Details that is not usually noteworthy but may be useful in debugging e.g. print the actual list instead of just its size
3.11. Configuration
Certain properties of the application can be controlled (e.g user prefs file location, logging level) through the configuration file (default: config.json).
4. Documentation
Refer to the guide here.
5. Testing
Refer to the guide here.
6. Dev Ops
Refer to the guide here.
Appendix A: Product Scope
Target user profile:
-
anyone who engages in group activities that involves spending
-
prefer desktop apps over other types
-
prefers typing over mouse input
-
is reasonably comfortable using CLI apps
Value proposition: manage debts faster than a typical mouse/GUI driven app
Appendix B: User Stories
Priorities: High (must have) - * * *, Medium (nice to have) - * *, Low (unlikely to have) - *
| Priority | As a … | I want to … | So that I can… |
|---|---|---|---|
|
user |
add contacts |
so that I can keep track of my list of contacts. |
|
user |
set how much each of my contacts owe me |
so that I know the amount of money each person owes me. |
|
user |
set how much I owe one of my contacts |
so that I know who I owe money to. |
|
user |
see the details of the balances of each contact |
so that I know which activity each transactions were from. |
|
user |
create a group activity with multiple contacts |
so that is easier for us to keep track of the group’s expenditure. |
|
user |
see how much each person should be paying each other at the end of the activity |
so that I can avoid confusion |
|
user |
delete expenses |
remove incorrect entries |
|
user |
delete group activities |
remove activities that are over |
|
user |
specify when a contact borrowed money from me |
know how long he has owed me money for. |
|
user |
specify when I borrowed money from a contact |
know how long I have owed money for. |
|
user |
sort my contacts |
filter through information. |
|
traveller |
add expenses in other currencies |
keep track of debts. |
|
traveller |
have expenses in other currencies to be converted to a single currency |
simplify my life. |
|
user |
attach tags to individual expenses and activities |
search more conveniently. |
|
user |
tag an expense with a picture |
keep electronic copies of receipts or invoices as proof. |
|
user |
see all my activities in a calendar view |
keep track of what has happened. |
|
user |
set a recurring reminder for contacts that owes me money |
know when to request people to pay back. |
|
user |
set a recurring reminder for contacts I loaned from |
know when to pay them back |
|
user |
add profile picture to a contact |
know how they look like. |
|
user |
export my data and import it from a different application |
can sync my debt through multiple devices. |
|
user |
set up automated periodic notifications (emails, etc.) to people who owe me money |
remind them to pay me back. |
|
user |
keep track of objects that I lent and borrowed from other people |
remember to return them. |
|
user |
specify conditions on the loans |
assure the loaned items are returned in a specified condition. |
|
user |
export the data to other format (.ics etc.)i |
export the data to other applications. |
|
traveller |
create a common pool of funds to spend for large group activities |
simplify tracking of common expenses |
|
user |
extract information from a picture of a bill |
save the trouble of entering expense details myself. |
Appendix C: Use Cases
(For all use cases below, the System is the SplitWiser and the Actor is the user, unless specified otherwise)
Use case: List contacts
MSS
-
User requests to list contacts
-
SplitWiser shows a list of contacts
Use case ends.
Extensions
-
1a. The list of contacts is empty
Use case ends.
Use case: List activites
MSS
-
User requests to list activities
-
SplitWiser shows a list of activities
Use case ends.
Extensions
-
1a. The list of activities is empty
Use case ends.
Use case: View an activity
MSS
-
User requests to view an activity with a specific activity ID
-
SplitWiser shows details of the specified activity
Use case ends.
Extensions
-
1a. No activity exists with the specified activity ID.
-
1a1. SplitWiser shows an error message.
Use case ends.
-
Use case: Create an activity
MSS
-
User requests to create an activity with a given title and participant(s)
-
SplitWiser creates the activity with the supplied title and no expenses
-
SplitWiser adds the user and the supplied contact(s) to the activity
-
SplitWiser shows details of the newly created activity
Use case ends.
Extensions
-
1a. User specifies one or more participants that are not found in the list of contacts
-
1a1. SplitWiser prompts the user to create new contacts for each of the missing participants
Use case resumes at step 2.
-
Use case: Delete contact
MSS
-
User requests to list contacts
-
SplitWiser shows a list of contacts
-
User requests to delete a specific contact in the list
-
SplitWiser deletes the person
Use case ends.
Extensions
-
2a. The list is empty.
Use case ends.
-
3a. The given index is invalid.
-
3a1. SplitWiser shows an error message.
Use case resumes at step 2.
-
Appendix D: Non Functional Requirements
-
Should work on any mainstream OS as long as it has
Java 11or above installed. -
Should be able to store up to 1000 contacts and activities without a noticeable sluggishness in performance for typical usage.
-
A user with above average typing speed for regular English text (i.e. not code, not system admin commands) should be able to accomplish most of the tasks faster using commands than using the mouse.
-
Should run smoothly on reasonably lower spec computers.
Appendix F: Limitations of double
It is important to note that SplitWiser in its current iteration uses double to represent expense amounts and debt values. While we maintain that this choice is sufficient for the intended uses of SplitWiser (i.e. to simplify debt calculations among friends), it is nonetheless essential as the developer to be aware of the issues that can arise with using such a representation.
Java uses the double precision 64-bit IEEE 754 floating point format to represent doubles, which internally comprises 1 sign bit, 11 exponent bits and 52 mantissa bits. The finite digit nature of the mantissa consequently results in potential loss of precision when attempting to add or subtract numbers which have a wide range in magnitude. One example is as follows:
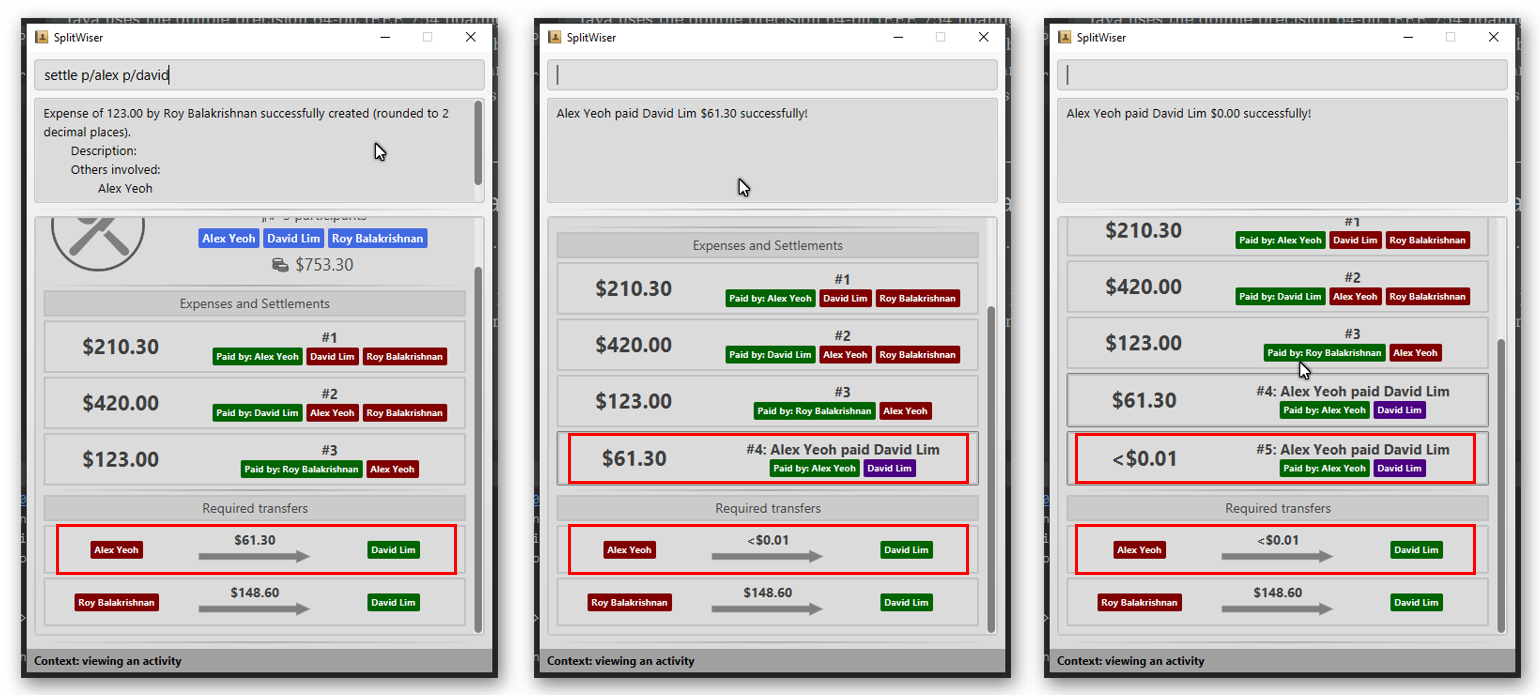
Here, if Alex attempts to settle the debt with David using settle p/alex p/david, the debt re-calculations will result the debt still being non-zero. In fact, if the user attempts executes another settle p/alex p/david, the debt still remains!
Appendix G: Instructions for Manual Testing
Given below are instructions to test the app manually.
| These instructions only provide a starting point for testers to work on; testers are expected to do more exploratory testing. |
G.1. Launch and Shutdown
-
Initial launch
-
Download the jar file and copy into an empty folder
-
Open the terminal.
-
Navigate to where you saved the jar file.
-
Execute the file with
java -jar <name of jar>
Expected: Shows the GUI with a set of sample contacts. The window size may not be optimum.
-
-
Saving window preferences
-
Resize the window to an optimum size. Move the window to a different location. Close the window.
-
Re-launch the app by double-clicking the jar file.
Expected: The most recent window size and location is retained.
-
G.2. Deleting a person
-
Deleting a person while all persons are listed
-
Prerequisites: List all persons using the
listcommand. Multiple persons in the list. -
Test case:
delete 1
Expected: First contact is deleted from the list. Details of the deleted contact shown in the status message. Timestamp in the status bar is updated. -
Test case:
delete 0
Expected: No person is deleted. Error details shown in the status message. Status bar remains the same. -
Other incorrect delete commands to try:
delete,delete x(where x is larger than the list size) {give more}
Expected: Similar to previous.
-
G.3. Saving data
-
Dealing with missing/corrupted data files
-
{explain how to simulate a missing/corrupted file and the expected behavior}
-
{ more test cases … }